Skip to content

Warbonnet Ridgerunner Bridge Hammock Review

warbonnet-ridgerunner-promo

Warbonnet Ridgerunner Bridge Hammock Review Video

Overview

The Warbonnet Ridgerunner is a bridge-style hammock designed to have a flat, head-to-foot lay similar to all bridge hammocks. Unlike traditional gathered-end hammocks, a bridge hammock is designed more like a cot with the bed fabric spread apart with the use of bars on the head and foot ends.

The Ridgerunner includes an integrated, zippered bug net that can unzip and stow in a pocket on the foot end. When deployed, the bug net is pulled off the occupant with some shock cord on both head and foot ends. Large storage pockets, called “saddlebags,” are located on each long side of the hammock, near the head end.

The double layer hammock, which I tested, adds 50 lbs (23 kg) of breaking strength compared to the single layer model, but also forms a sleeve where a pad can be inserted for insulation beneath.

warbonnet-ridgerunner-padsleeve

The hammock comes with appropriate rigging to hang the hammock. My hammock came with 12 ft (366 cm) long webbing straps and cinch-style triangle buckles.

Product Information

MANUFACTURER Warbonnet Outdoors
YEAR OF MANUFACTURE 2013, made in USA
MANUFACTURER’S WEBSITE http://www.warbonnetoutdoors.com/ridgerunner-hammock/
MSRP
  • $195 USD (double layer hammock + integrated bug net)
LISTED FEATURES
  • Bridge style hammock
  • Double layer body for inserting a sleeping pad
  • Two general-purpose storage bags on each side of hammock
  • Integrated zippered bug netting (can be zipped down and stowed in a pocket on the foot end)
MANUFACTURER RECOMMENDATIONS Weight limit 250 lbs and length 6’6″ or 115 kg and 198 cm.
MEASUREMENTS
  WHAT THEY SAY WHAT I SAY
Weight
  • Hammock + Suspension:
    27 oz (765 g) for hammock + suspension
  • Spreader Bars: 9.9 oz (280 g)
  • Hammock: 25 oz (708 g)
  • Spreader Bars: 10 oz (284 g)
  • Suspension + Hardware: 8.8 oz (252 g)
Total 37 oz (1,045 g) 44 oz (1,244 g)
Dimen Not listed
  • Ridgeline: 120 in (307 cm)
  • Pole width (head): 36.5 in (93 cm)
  • Pole width (foot): 29.625 in (75.25 cm)
  • Center width: 29 in (74 cm)
  • Shoulder width: 35.125 in (89.22 cm)
  • Length: 121 in (307 cm)
MATERIAL
  • Hammock: breathable water-resistent ripstop nylon fabric; metal hardware
  • Spreader bars: aluminum
  • Bug net: no-see-um netting

Field Experience

I’ve had the Ridgerunner for several months now, and have used it on a few backpacking trips and several car camping trips during that time (including a few backyard hangs). It has really been a pleasure to sleep in, although I will admit that bridge hammocks have their own unique lay and may not work for everyone.

The Ridgerunner bridge hammock is sleek and refined and gives the impression of a high-performance sports car. The stitching and build are straight and solid. I did find a few loose strands of nylon on the hammock body, but otherwise it has a very clean appearance.

Setting Up

Like all bridge hammocks, the set-up process is different than a gathered-end hammock. First off, your hang point will be about a foot (30 cm) shorter, and when the hammock sags down it will nearly touch the ground. Once the spreader bars are in place, the hammock will raise to the right position.

warbonnet-ridgerunner-hangpoint
The span on this set up is close to 18 ft, yet my hang point is about 4 ft off the ground.

Because the Ridgerunner doesn’t use a ridge line, it is important NOT to pull the hammock too tight, otherwise the hammock can bow backward. Keep at least a 30-degree angle coming down from the suspension lines.

warbonnet-ridgerunner-poles

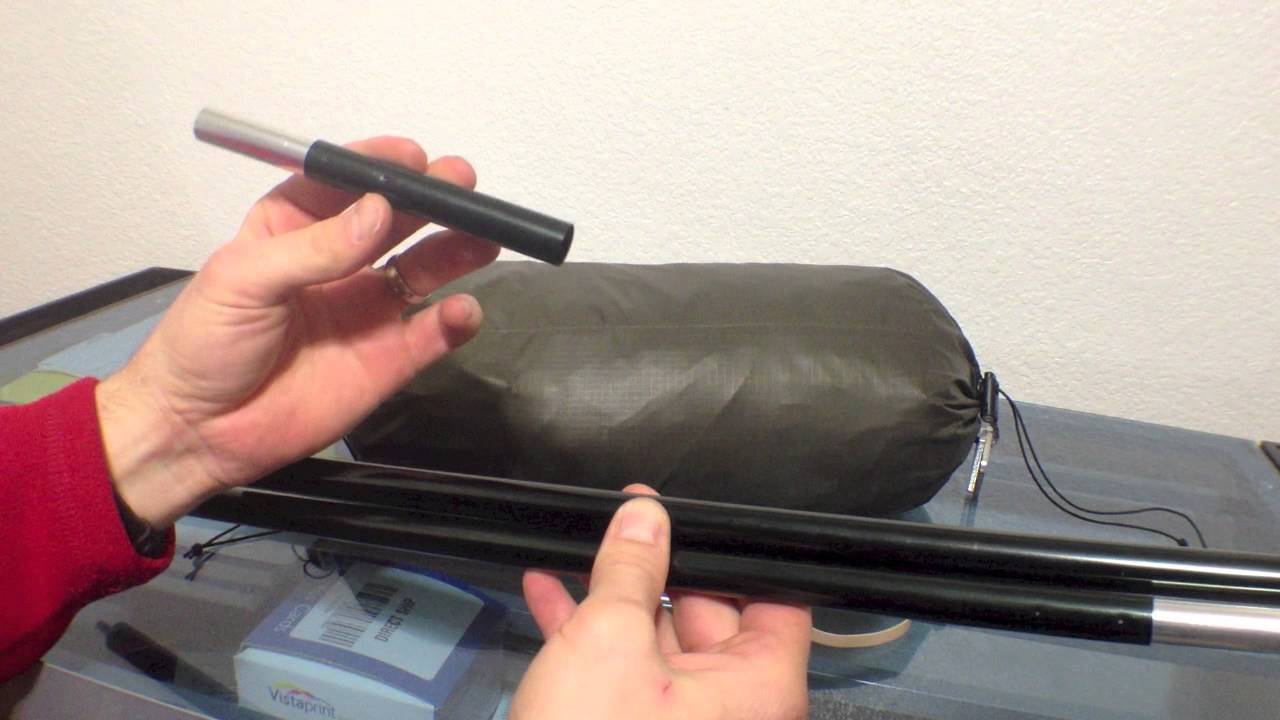
All the poles are very close in size, but there are two longer poles and two shorter poles plus a very short connector pole. The two longer poles match with the connector pole to make the head spreader bar. The two shorter poles connect to make the foot spreader bar. I wish the poles were more visibly marked to aid in assembly, or if they had shock cord inside to keep them together. One of my biggest worries has been to lose the small connector tube on a hike. Unfortunately, the Ridgerunner doesn’t come with a storage bag for the poles, so keeping them contained and ready for assembly is up to me. I currently keep a few thick rubber bands around the poles and store them inside my backpack.

warbonnet-ridgerunner-straps

The bug net has shock cord with plastic mitten hooks attached on the ends. I clip these hooks to the apex of the bridge ridge point. I found I could go without clipping the foot end and I didn’t really have any sagging problems, although clipping both ends does give the netting a nice shape and maximizes the interior space.

warbonnet-ridgerunner-bugdetail

In terms of tarp coverage, a rectangular or hex-style tarp are the best option, especially something with wide panels to fully cover the hammock. Any regular hammock tarp with a 12 ft (3.6 m) ridgeline should work just fine, although longer tarps would be better, especially if you plan on adding doors to enclose the head and foot areas. Otherwise, expect that the rigging will be exposed somewhat. I don’t have any fears of water seepage along the suspension lines as there are plenty of drip off points before any fabric is touched.

Other Thoughts

Of all the bridge hammocks I’ve tested, the Ridgerunner has the widest and shallowest bridge design of all, particularly on the head end. This is the side where most people have complained about shoulder squeeze, which is a common  experience in bridge hammocks to some extent. I have never felt any squeeze or pressure points on my shoulders or body laying in the Ridgerunner. It really feels like laying in a cot, although I will admit that in the foot end my feet do slide together. This isn’t much of a bother to me.

All bridge hammocks are slightly “tippy” and the Ridgerunner is no exception. You can remove the small connector bar on the head end to deepen the hammock bed and stabilize it more, but it does affect the squeeze in the shoulders.

warbonnet-ridgerunner-footend

Bridge hammocks, including the Ridgerunner, are less “snuggly” than gathered-end hammocks, but their flattened shape makes it easier to insulate, in my experience. The double layer, for example, makes it easy to slip in a traditional sleeping pad, but it’s more than that—the rectangular shape of the hammock means the pad doesn’t curl, crinkle, or bend inside the hammock. Wide pads (>20 in/51 cm) are best to get shoulder coverage.

The one thing that surprised me the most with the Ridgerunner was the weight. Of all the bridge hammock’s I’ve tested, I was expecting it to be the lightest, based on the light fabric, thinner webbing, and use of 7/64″ Amsteel for the suspension. However, because the Ridgerunner deploys a much wider spreader bar on the shoulders, the need for a larger triangle to create the suspension is required. Adding up the extra poll length, extra suspension material, and you then account for the extra weight. Bridge advocates, and hammock users generally agree that a few extra ounces is worth it for a comfortable night’s sleep.

Brandon has done a great job at crafting this hammock and I can find nothing on the hammock that is superfluous that could be removed to save weight—everything has been meticulously engineered to serve a necessary function. The saddlebags, for example, are not just a handy storage area, they help gusset the space between the taut hammock body and the bug netting, preventing any stress tears. It’s an ingenious design.

Besides the pole situation, the overall length of the Ridgerunner is probably its biggest shortcoming. From the tip of the triangle on the head end to the foot end, the ridgeline measures approximately 13 ft (4 m), depending on how tight you hang. This results in the longest minimum hang requirements of any backpacking hammock I’ve tested, at about 15 ft (4.5 m). This can pose a problem in finding an ideal location some areas. I’ve found that a location with 18 ft (5.5 m) or even 20 ft (6 m) between anchor points is ideal.

Summary

The Ridgerunner has a winning design in terms of sleeping comfort. The addition of the included bug net make this a real competitor in the hammock camping market. The only thing missing is a matching tarp[1. To clarify, I mean that the hammock doesn’t come with a tarp. Nearly any hammock tarp will work with the Ridgerunner, including the Cloudburst that Brandon sells, but they are sold separately].

I do not recommend using anything but the supplied poles as spreader bars due to the risk factors involved.

UPDATE: Brandon sells hiking pole adapter tips that will allow you to use trekking poles as spreader bars. My concern here is that you assume some additional risks with collapsable poles, including sections slipping and pole ends not connecting adequately. Always test first!

The Ridgerunner isn’t the lightest of the bridge hammocks, but it isn’t oppressive either. Depending on the trip, I would consider packing it because of the great lay it provides. I’ll definitely bring it to base camp trips, but I don’t consider this a loaner hammock; this is a keeper.


Disclosure of material connection: The author (Derek Hansen) was provided with a free sample from the manufacturer for testing and evaluation purposes. The comments in this post (written & spoken) are of my own opinion, which I formed after personally handling the gear.

45 thoughts on “Warbonnet Ridgerunner Bridge Hammock Review”

  1. “The only thing missing is a matching tarp.” …perhaps if the ‘Cloudburst’ was 12” longer? otherwise, it was built to match the Ridgerunner.

    1. There are a lot of tarps that will cover the main hammock body, and yes, the Cloudburst will work 🙂 But even these tarps will not completely cover the triangle suspension on the hammock. It’s not a huge deal because Brandon has designed the Ridgerunner with multiple drip-off points.

  2. Good review Derek.

    Your video seems to be set to Private.

    There is a great aftermarket pole bag made specifically for the RidgeRunner poles available at Arrowhead along with several other accessories.

    I am curious why you say not to use anything else for spreader poles than those included…Warbonnet offers accessories specifically so you can use some hiking poles as spreader bars and for over a year I have only used the supplied poles 2 or 3 times….and never on a hiking trip. I purchased some new hiking poles specifically for the use as spreader bars on the RR. O and there is a tarp made as a matching tarp to the RR…the Cloudburst by WB was designed just for the RR.

    Otherwise great summery.

    Paul @ Arrowhead Equipment

      1. Thanks for the clarifications Derek. I will note to that there are a number of poles that will work without the pole adapters as well but you do need to be cautious of any rough edges they have as they could rub on your tarp or other gear. If using hiking poles one thing to look for in a pair is a set that has a lock feature for the shock…being able to remove the springiness that the shocks offer helps with how solid the poles will feel. The ones I use in particular feel way more solid than the stock poles that come with the RR….at least in my opinion.

        Paul @ Arrowhead Equipment

        1. Thanks Paul. This is great information. It does bring up a good point about tarp coverage. With the spreader bars, there are limits to how tight you can (or should) pitch a tarp over a bridge hammock, as far as being mindful of the metal hardware and abrasion.

  3. Thank you for the review!

    I own Blackbird hammock and think that maybe I should try Ridgerunner. I suppose that along with the new experience I will have lighter UQ and the ability to use my hiking poles as spreader bars, and without suspension (but including triangles) the difference in weight won’t be so big.

    But I doubt if I really need this new experience. How is Ridgerunner comparing to Blackbird in terms of comfort? I like the Blackbird and sleep well in it (usually I start on my side in fetal position (I’m 5’8″ / 132 lbs) and then sleep on my back), though I have now idea what is it to sleep in the bridge hammock.

    1. Comparing a bridge hammock to a gathered-end is nearly as productive as comparing apples with oranges. Some folks who love bridges can’t stand gathered-end and vice-versa. Bridge hammocks offer a unique lay. For me, they compare a lot with cots, although there are less suspension points so the fabric conforms to your body better in a bridge hammock. I think bridge hammocks are very comfortable and are easier to find a “sweet spot” than a gathered-end, typically. I often recommend bridge hammocks to people who want to try hammocks but haven’t been able to get comfortable in a gathered-end. Bridge hammocks are also easier to insulate.

      I would try one before buying one. See if it is something that works for you.

  4. Thank you for the review.*** Very interesting, all this hammock camping stuff. So interesting to see so many variations and innovations in backpacking. This ability to use a normal sleeping pad really piques my interest.

    BTW, a little epoxy from any big box store or your local hardware store should keep that short 4″ section of pole attached to the long section. No need to shock cord the pole.

    ***Oh yes, when you stopped talking and the musical soundtrack came on, the volume doubled. Ouch.

    1. Jeff, thanks for the tip on glueing the poles together — that might be a great option for some folks. And, sorry about the sound quality. This is something I’m working on, trying to slowly accumulate the right gear, etc.

  5. Very nice review! I’m new to hammocks and this review really helped.

    A side view picture of the hammock hanging with a person in it and no tarp as well as a picture showing where your head is in relation to the top spacing would be ideal to add.

    I love your book, especially the inviting and informative pictures.
    Thanks!

  6. “…the inviting and informative pictures.”
    Bob hit the nail on the head. Your illustrative skill is phenomenal! I see your drawings everywhere and know it’s yours right away.
    This review is very useful. I am still right at 250 lbs and reluctant to pull the trigger on the WBRR. I will probably end up getting a Warbonnect Blackbird XLC DL which your review of helped as well.

    Humble gratitude is offered to you for all the teaching and guidance you have provided to so many.

  7. You list the ridge line as 120 inches. Is that from cross bar to cross bar? What would the ridge line be from the top of the triangle to the top of the triangle?

    1. From the report:

      Besides the pole situation, the overall length of the Ridgerunner is probably its biggest shortcoming. From the tip of the triangle on the head end to the foot end, the ridgeline measures approximately 13 ft (4 m), depending on how tight you hang. This results in the longest minimum hang requirements of any backpacking hammock I’ve tested, at about 15 ft (4.5 m).

  8. Would you recommend this hammock for a 6’3″ side sleeper? If not, what would you recommend? I am looking to replace my ENO Doublenest

  9. I wonder if you couldn’t attach a copper pipe cap fitting to those bar mounting points. Then you don’t have to carry any bars, but just cut two sticks for spreaders, and slip them into the cup of the cap fitting.

  10. Nice review of the WBRR. Josh makes 6 oz carbon replacement poles for the RR. He has an option of no small bar extension at the head, which I opted for. If you order insist on the solid carbon ferrule at both head and foot ends. I did have a hollow ferrule break. Josh was quick to replace it. I did have two more days left on the hike and improvised a replacement pole in the field.

  11. I read that the RIDGERUNNER HAMMOCK can be bought in 2 sorts.

    normal Fabric: 1.1oz/30D Nylon (x2)
    Hammock weight (whoopies): 1 lb 7.5oz.

    or

    the multicam Fabric: 1.9oz/70D Multicam® inner+1.1oz/30D outer
    Hammock weight (whoopies): 1 lb. 11oz.

    there is a difference in weight.

    My question: is the difference (in your opinion) to consider for the better quality of the fabrication or only to consider to have the camouflage.

  12. @PJ: I wouldn’t recommend using sticks as poles. First, there is a good amount of compressive stress on those poles, so you’d need a very stout stick with very straight grain and no knots. Second, in order to cut the ends very straight and neat, you’d need to carry a saw. That pretty much negates your weight savings.

  13. I received the Ridgrunner earlier this week.
    I would like to hang it in the house and got some wall brackets.
    The distance between the wall brackets will be 20′ or 6 meter.
    Any advice how high the wall brackets should be placed to get the hammock at 70 cm high?

      1. I did, but every review is stating that the bridge hammock should be strapped quite a bit lower as a gathered hammock.
        So does the calculator also works for bridge hammocks?
        I was not sure about that.

        1. Sorry about that, you are absolutely correct. I forgot to mention that. Basically you set the hang point a foot lower than the calculator states. I’m working on an update to accommodate bridge hammocks.

          1. Thanks for the quick reply, Derek.
            Both walls are concrete, so I like to get it correct the first time.
            Drilling will be hard enough, don’t want to do it more then once. 🙂

      2. My use of the hang calculator gives 4.8″ hang height if I did it correctly.
        that is 20 ft, 20 degrees, 120 in. ridgeline length, 220 pounds, hammock length 121 in., set height 27.6 in.
        seems 2 ft 8 in would be too low. hammock would be stretched horizontally.
        Derek, what did I miss?

    1. I used 20 ft for distance between anchors, other dimensions as above except 4’8″ – 12″ = 3’8″ hang height.
      Seems like I’m missing something??

    2. I’m not sure where to post this question, so I’ll add it to this article, which has a “comparison” flavor to it anyway. Generally speaking, are there any places (vendors) in the U.S. where these hammocks are set up and able to be tested by potential buyers? I’m thinking along the lines of REI or some place like that. I’d like to test a few different ones before picking the one that’s best for me. Thanks.

      1. Not that I know of. There are a few shops that have tried a rental program but those haven’t been very popular either. One of the best options I’ve seen are group hangs; where like-minded hammock folks gather over a weekend to camp and share experiences. It’s a great way to see dozens of different hammocks and try them out. Trouble is, finding a group hang in your area at a convenient time is rare. You can pop over to hammockforums.net and search. Where are you located? There may be folks nearby who can meet you and swap gear to try.

      2. It depends on what you mean by “test”. Most of the small manufacturers won’t mind if you come by their shop and hang in one for a test. Unless your test involves sleeping in it over night 🙂 Of course, that only works if they are located relatively close to you. I like Derek’s idea of attending a group hang.

    3. I just got my Ridgerunner today, and I have to tell somebody about it. I set it up, like most said leave it sag close to the ground, and when you put the bars in it will be just right. Well, I found myself laying on the ground. Tighten, lift, tighten, lift, raise head end. Ahhhhh. It felt really nice. So now time to put on my underquilt. Well, my DIY underquilt at 48″ wide was too wide. That’s ok, I shoved a Thermorest in between layers. Hey, better, but still. Then I shoved in my Nemo Cosmos pad. Oh baby, it’s better than my bed. Flat, warm, soft. I could lay on my back, on my side, and yes even on my stomach. It will be interesting to see if I sleep. I liked laying in my Kammock, but could never sleep.

      Stay tuned, I spend the night out next Thursday.

    4. Pingback: Review: Nemo Cloudview Hammock - The Ultimate Hang

    5. Hi there you spoke about the Catenary cuts. I have a Streamliner hammock from Simply Light Designs that definitely give a shoulder squeeze. Does a similar situation occur with this style hammock?

      1. Personally, I think all bridge style hammocks have some of this issue, but it can be mitigated with a stiff air pad. Some are better than others and it’s all in the bed curve. The Ridgerunner has a modest curve, so it isn’t so bad. The Hedsen or Chrysalis is pretty flat too.

    Leave a Reply

    Your email address will not be published. Required fields are marked *

    This site uses Akismet to reduce spam. Learn how your comment data is processed.