Skip to content

Hammock Water Breaks and Drip Lines

Make sure that your water break or drip line is protected under your tarp!

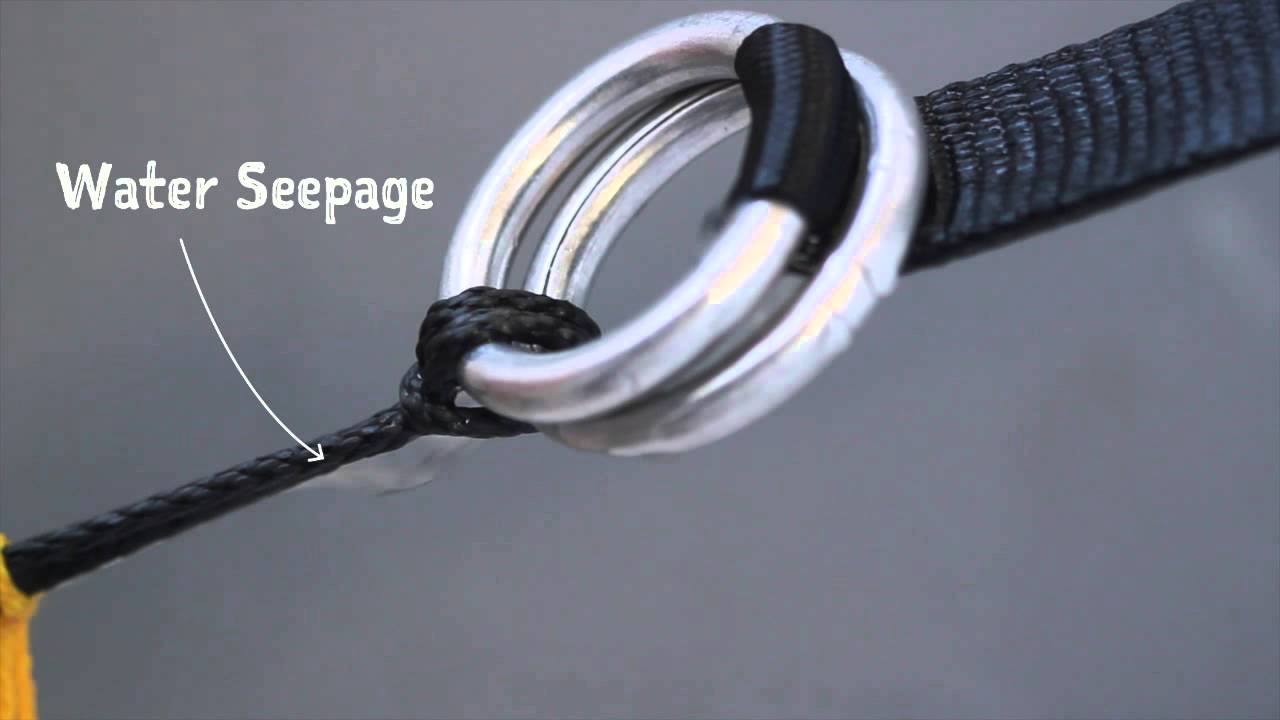
Any exposed portion of your tarp or hammock suspension can convey water during a rain storm (or other precipitation). Using a water break or drip line will help prevent water from seeping down your suspension line and soaking your hammock.

(Hammock Water Breaks and Drip Lines Video)

In my testing, I found that most hardware devices are not 100% effective as I had originally thought. I was a little disappointed to find that some hardware devices were only good in certain conditions, and if there was a slight twist, even small amounts of water flow easily past the water break and continue down the suspension.

The only thing that worked 99.9% of the time was a simple string tied to the suspension. The best method was to tie a Prusik or Klemheist knot, which provided a firm connection to the suspension and helped divert the water the best. My recommendation is to add a simple string to your suspension, regardless of what suspension system you use.

Regarding Tarps

If you use a continuous ridge line to tie up your tarp, you have the option of running the line over or under the tarp. In times past, I have recommended running the line under the tarp in certain adverse conditions. I now do not recommend this at all. I highly recommend always running a continuous ridge line over the tarp for the best drip protection, among other advantages.

Last year during a very wet and rainy camping trip, I awoke with a start after feeling a drip of cold water on my face. Feeling around in the dark, I also felt pools of water on my sleeping bag. Camping with the Boy Scouts, I half expected to see my scouts trying to play a prank, but I was stunned to see a large quantity of water forming under my tarp that was dripping constantly on my sleeping gear.

At first, I worried my tarp had a leak, but after inspecting the tarp, I found that water was running down the tarp ridge line and then flowing under the tarp, adhering to the ridge line that was also running under the tarp. Unwittingly, I had provided a conveyance for the water, and as it hit certain low points on the tarp, it would cohere and then drip down the inner part of the tarp.

A Continuous Ridge Line for a Tarp using Two Carabiners

I learned a lot about water on that trip. I don’t think I’ve ever camped in such a wet  camp nor had this type of saturation. The rain was so constant that the tree trunks were running with water and it looked like someone had turned on a hose and stuck it on my hammock and tarp suspension; it was flowing that thick and strong.

Thankfully, the water break on my hammock suspension did its job, but I realized that I also needed to do something similar with my tarp. By running my continuous ridge lines over my tarp, I have solved nearly all those issues. I also prefer to use simple hardware devices such as the LoopAlien or the Dutchware Stingers that provide a hardware water break as well.

56 thoughts on “Hammock Water Breaks and Drip Lines”

    1. You’re welcome. Do you have my book? It’s a great field reference with all the illustrations in one handy, compact source; there’s even a digital version 🙂

      1. This worked in Brunei: cut a squash ball in half; cut a slit in it and slide hammock strap through for tight-fitting drip stopper.

  1. Derek – great ideas! So little rain in Sierra and Socal mtns that my hammock and fly never tested in anything but short, light rain. Yet. An accident waiting to hapen with no drip lines and ridge line under fly. Who knew?

    I’ll be doing mods and sprinkler test before I get nailed!

    Thanks, Todd F.

    1. I live in a similar climate. The monsoon season in Arizona is pretty predictable. Still, getting caught in a deluge can really batter your gear. It was fun to do all the testing, challenging even my own preconceived notions.

  2. I have found that small strips of camp towel material work best as they are so absorbent. Cut a strip and cut a hole on one end and feed the end through itself around the line.

  3. Derek:
    Still not fond of your method. There are 2 reasons why I use a full ridge line UNDER a tarp: First, is to be able to have better control of the center height of the tarp while hung. Secondly, and what I consider most importantly, is to take the tension off the tarp grommets so that the tarp will not tear in heavy wind or rain. Your set-up puts all the tension on the grommets.
    Let me know what you think.

    1. Bill: that’s a great point about the center height, couldn’t the tarp still be resting over the line and still be sliding? and maybe a loop of shock cord will relieve the tension.

    2. Bill, you have some good points, but let me add some other thoughts. There are different classes of tarps to consider: lightweight and heavy-duty.

      A lot of lightweight tarps today are made with catenary ridge lines that have a slight curve to them. This helps them stay taut with less tension. The cat-cut ridge lines shed wind better and don’t need the extra support underneath to stay firm. A ridge line under a cat-cut ridge defeats this design and actually makes the tarp perform worse.

      Light tarps—those made with silnylon, some polyester, and cuben fiber—don’t need any extra support in terms of lifting weight. However, this would be true of a heavy canvas tarp or maybe even one of those blue poly tarps with grommets.

      Speaking of tension on grommets, most lightweight tarps (e.g., sol, polyester, or cuben fiber) rarely use grommets, but instead use reinforced corners and webbing loops. These are less stressful to the fabric. Brian from OES and even JustJeff have both independently fail tested these tarps and found that the guy lines have ripped before the fabric or guy loops have failed. Heavy tarps that use grommets, on the other hand, are more prone to ripping because the metal (or plastic) grommets can actually cut into the fabric. One huge problem with grommets is that they represent a hole already in the fabric—a weak point waiting to be exploited. Sewn loops, on the other hand, reinforce the fabric and are stronger.

      Don’t over tension your tarp. I get the impression that some folks think they need to ratchet down a ridge line. This is bad practice and can lead to the failure you describe. A basic rectangular tarp will have at least six (6) guy points: two on the ridge line, and four to tie off the corners. All of those points work in concert to get the tarp taut. I recommend setting the ridge line first and get it firm, but with a tiny bit of wiggle room. This “extra” slack (not much, mind you) is taken up by the side guy points. If you use shock cord tensioners (I highly recommend them), then your whole tarp will have a nice “reactive” pitch. The shock cord provides some firm but flexible movement in the case of gusting wind. The last thing you want is to pitch a tarp so tight that the only flexibility is to have the fabric fail.

      I agree with your points if you are using a heavy tarp or one with grommets, but lightweight tarps—particularly those with cat-cut edges and ridge lines—aren’t a concern. Metal or plastic grommets can be a concern, but unless you are using a heavy canvas tarp or an inexpensive “blue tarp,” most camping tarps are not designed with grommets so they don’t pose the risk you describe.

      1. I agree that sewn loops are stronger, but even so, I don’t like to tension the midline of the tarp to keep it taut. I prefer the ridge line to take the real tension. Sagging or bunching as you mention is possible and probable, so I attach small Prussiks to the ridge line that I attach to the tarp grommets. These don’t have to be pulled very tightly to keep the tarp from riding. So the tarp stays put without a lot of tension across the midline. This is more of an issue when hanging tarps without hammocks beneath them, which we often do on Scout outings. You’re a SM, so I’m sure you know how tarps get used and abused!

  4. Hey Derek,
    I’m not a big fan of separate items like carabiners or clips etc., I like to use knots. I thought a lot about how to break the water flow, and was happy to see your video about this topic. Today I tried the slippery sheet knot by myself but It did not work at all. Are you sure that this knot breaks the water flow?
    Regards form Austria

    1. The test I did was not exhaustive. In fact, I was pretty sure it wouldn’t work initially because the lines are connected. I’d have to do more testing to compare. I typically use the slippery becket hitch with a short rope loop on the hammock and webbing. What do you use? What were the testing conditions?

      1. Not sure if I am replying in the correct section but here goes. The ridge line that runs on the outside of the tarp is a great idea BUT what about those of us that have an Eno and use the bug net that attaches to the ridgeline? If the ridgeline is on top of the tarp there is nowhere to attach the little hook. ~ confused

        1. One solution is to run a length of cord that is attached to the tarp and runs from end-to-end that is separate from the ridge line. This gives you the clipping point for the bug net and a dry place for clothes, etc. without affecting the continuous ridge line’s effectiveness.

  5. Any hints for drip lines on webbing suspension? I would think that if you “attach” the line too tight, the webbing will curve & create a tunnel for the water to flow through. Too lose & the water slips around the edges….
    Or is that the advantage of the knots you recommend: the multiple loops provide multiple places to catch the water…
    Just wondering if there is a “just right”.

    1. I still have some more testing to do on straps. They provide so much surface area when used as suspension lines that the carry a significant concern. If you use a hardware break, such as the descender rings or tri-glides, they will provide some protection and then add a drip line after that for more complete protection.

      I’ll do some more experimenting on my side, and if anyone else has done some testing, please post it!

      1. I’d be curious to see if you have any update on the topic of webbing suspension and drip lines. I have begun using the beckett hitch with my continuous loop after watching some of your videos but would like to prevent water seepage.

      2. I’ve used a couple of old cheap guy lines on strap. I’ve got a daisy chain straps so I just tie a few on each side. Putting one on top and moving down and put the other on the bottom. Just a simple figure 8 knot with the other end feed though it. With that in mind I’ve never been in a major rainstorm. But for a small rain it worked for me. But I do need to get something what’ll work for all types of rainstorms. That way I won’t have to worry about the rain at all.

  6. I tend to tie off the loose end of the woopieslings with an overhand knot between the hammock and the bury. Haven´t been in heavy rain but this gives two spots where the water can follow the low path, once where the line comes out from the bury and hangs downwards and once where that loose end is tied to the cord that connects towards the hammock. Hope that´s understandable. 🙂

  7. Hi Derek,
    I noticed you mentioned your book in the comments above.
    I’ve also heard mention you were ‘working’ on an update…
    Thing is I’ve been hanging out (ok… pun intended) for your update before buying the book.
    It’s been a long wait.
    Care to enlighten us on how or when this update might happen???
    Cheers, Andrew

    1. Andrew, thanks for the question. Yes, I am working on an update to the book. It is pretty significant and is taking a lot of time. Lots more illustrations, more content, more details, more, more, more. The publication plan is the end of 2014.

      1. Thanks Derek. I don’t envy your task at all.
        If I may ask the big question though…
        Should one buy the current edition or hang out for the update?
        Cheers

  8. Derek

    In the past I’ve used cotton rope as a water run off. It’s a natural wick for moisture. You may want to give it a shot. WONDERFUL site and book. My girls and I would not be out in the hammocks without your help. Great work!

    1. Thanks Travis! Great tip. I agree with you: a small string, simple as it may be, is one of the best methods in diverting water.

  9. I am confused that you mention using hardware. Looks to me that using the hardware would be difficult to have a continuous ridgeline.

    How would you use the stingerz on a continuous ridgeline?

  10. I recently purchased my first Hennessy, which I’m really excited about. I live in Minnesota and go up north to the boundary waters every summer as often as I can. In large part to your blog and book I finally felt informed enough to switch to using a hammock system rather than tent, thank you for that, it’s been a awesome change. I took my eno and accessories and was way happier in that than I have ever been in a tent. But, I still noticed enough things I didn’t like about my eno system so that when I came home, after extensive research, got the Hennessy. With that purchase I also got their Auto Magic water collectors to put on the fly. Do you have experience using those and if so do they work to keep the water out of the hammock as well as what you have suggested? They seem like a great idea, I’m just wondering if I can expect they could not just add tension to the tarp and collect rain water for camp use but also help with the water running down the line into the hammock or would you recommend a separate system in place? Oh, I’m not using a Hennessy tarp, I decided to just get the hammock and use the Kelly Noah tarp I have and love instead. I know the Hennessy tarps connect to the line the hammock is strung from so I’m wondering if using a tarp not strung to that line will mean that line will need its own stop gap for the water. Thoughts or suggestions?

    1. Thanks Ely!

      The water collection cups from Hennessy work great on the ends of the tarp where the large surface area on the tarp can channel water into the cups and then into a water bottle. They won’t work well on the hammock suspension nor work as a water diversion on the suspension. The easiest thing to do to divert water off the suspension system is use a drip string.

  11. Hi Derek, just getting aquatinted with hammocks and was excited to find your site. Some great stuff here. I thought this piece was excellent as well, since it covered an area not covered much elsewhere, and your lab approach seemed thorough and scientific. I did see one problem however: at about 5:30 in the video in the Dutchware whoopie clip section, I clearly see water seepage past your string stop…

    1. Yes, this was mentioned before. The string wasn’t fully deployed, but it does show that even the string has some weakness. Another thing that has helped are silnylon snake skins. They help cover the suspension up to the tarp.

  12. Pingback: Hamacul ca solutie pentru camp | Blogu' lu' Yeti

  13. Hi Derek,
    Just spent my first night in a hammock over labor day weekend in the UP of Michigan. I did not do a dry run prior, but instead opted for the trial by fire method. After much fumbling (even after reading your book), and much heckling from family, I finally got everything set up, and enjoyed one of my best night’s sleep while camping ever (ha ha on my family – they were still wet from the previous night’s storms! One actually had to grab towels to mop up puddles in their tent. Haw Haw Haw I was dry as a bone). Gone was the problem of waking on a deflated airbed, sore and cold.
    Anyhow, I am continuing my education on the hammock system of camping, and am to the point of wrapping my head around a rain scenario. The question I have is in regards to my ENO Jungle hammock and Atlas XL suspension straps: how do I, and WHERE do I, apply the principals of the drip line to ensure maximum allowable dryness should weather set in? I almost think you would need to tie at least 2 to the carabiner on each end to cover yourself, but I’m not quite certain.
    Also, on multiple occasions you reference going over your tarp with the Ridgeline due to many benefits, yet I cannot seem to track down a bulleted list stating said advantages. Where is that list hiding?
    Thank you for all you do. It has enlightened and converted one more former ground dweller; I will try to never return to the earth if I can help it!
    Keep on keeping on!
    P. S. if you don’t have this man’s book, pony up the $4 on Amazon and get it for your kindle app. It’s like having the vast majority of this site in the palm of your hand. Admit it – you’ve spent $4 in far worse ways. Do it!

  14. If I may add, L. Man, you may want to add some line between the carabiners on the ENO and the carabiners at your Atlas Strap. That way you can put some drip prevention on the “in between line” and be sure both your ENO ends are under your tarp.

    We don’t get a lot of rain in the High Desert so I get lazy about my rain setup. Last time I was out, it rained. I had un-stake the sides and slide the tarp on its continuous ridge line so both hammock ends were well covered. But it was quick; got’er done between deluges.

    One plus for ridge line under the tarp is in the Winter, to help with any snow load. A minus for under the tarp is additional wear on the ridge line fabric – especially right were it was seam sealed – because of rubbing. Another plus for above is on a sunny day you can hang washed cloths on it and any drip will be on the outside of the tarp, not on your hammock – which would be the case if the “clothesline” were under the tarp.

    I put split rings between the D-rings and whatever I am connecting to the tarp. I figure the split rings will fail first. If one bends out, I can easily just attach to the D-ring or reconsider my location – if it is gusting enough to straighten out a split ring.

    Note on Derek’s book. I bought two so I have one at home and one to lend out. I’ll keep an eye out for his new book this fall and get two of those also. Need to support the good guys.

    1. What sort of line would be recommended? I’m a bigger guy (read: approx. 3/4 of the max rating on the ENO JH ;), so I need to have some confidence in the rigging. I don’t know I’d have a lot of faith in just 550 cord; seems a pretty light gauge to trust holding my backside up in the air.

      1. I think he is talking about a lightweight string that just ties to the suspension as a drip line, like I show in the video. Not weight bearing.

  15. Pingback: To Hang or Not to Hang | Hammock Backpacking Questions

  16. Hi, what diameter do you use for your drip line? Do you think there is a minimum gauge difference between the main and drip lines?

    1. Excellent question! I haven’t researched this, but in my testing I used a thicker diameter line. My hypothesis would be that thicker is better, and more absorbent is better (nylon, cotton).

  17. my thoughts exactly. not that i knew anything about cohesion, adhesion, tension and gravity. just that the string was at hand 😉

  18. When you use a prusik knot at one end, are you making that knot out of a separate cord or out of the ridgeline itself? I can’t quite tell from the illustration and I’m new to this. Thank you.

      1. Thank you. So how do you adjust the ridgeline? Sliding the knot along both parts of the loop, or pulling one part of the ridgeline cord? Sorry for the very basic questions but I’m practicing in my yard with two trees and I’m not sure I’m doing it correctly. Thanks again for your expertise and time. I’m going to buy your book but I suspect it doesn’t answer this basic of a question. I’ve slept outside in my camping hammock many times in many places but I’ve never rigged a tarp over it.

  19. Hi Derek, you have great illustration. I noticed in your illustration you have a adjustable Prusik using the same cord as your ridge line . How did you do that?

        1. Gotcha. Yeah, that advice is really important in climbing situations, but for small gauge tarp applications, it’s not much of an issue. In my own experience, using line of the same diameter has worked fine. Sheathed line has a better bight, and smaller diameter can be helpful, but because the tension is less than in climbing situations, it doesn’t have the slipping issue. Dyneema line can be more problematic, but I often just use additional wraps and snug it up.

  20. Derek, I had a thought about drip lines. What about using a LoopAlien? My current configuration is a continuous loop with strap an Becket Hitch. I am envisioning making a bit with the continuous loop and going through the large eye of the LoopAlien and over the medium peg. My LoopAliens have not arrived yet, so I cannot try it.

Leave a Reply

Your email address will not be published. Required fields are marked *

This site uses Akismet to reduce spam. Learn how your comment data is processed.