DIY Wood Gas Stove Instructions

NOTE: I originally posted this on HammockForums.net in January 2011, but it is only accessible by donating members, so I thought I would repost on my blog for easier access.

I’m a latecomer when it comes to wood gas stoves, but after building my own version over the 2010 Christmas break, I’ve recently turned into a fan. My first exposure to wood-burning backpacking stoves was a Sierra stove that another adult leader brought to a Boy Scout training event. At the time, I thought they were too much hassle, a bit messy, and (in the case of the Sierra) required batteries and electronics that I worried would be difficult to repair in the field.

After so many posts on HF, I decided to look into wood stoves and with sclittlefield‘s photos and instructions, I went out to build my own (I couldn’t afford any of the commercial variants at the time).

Do-it-yourself (DIY) Wood Gas Stove Instructions

There are a few ways to build a wood-gas stove, but this is how I did it. When I looked at other designs, the tool list included some peculiar tools that I would never really use much like large hole punches and strange lid removers. I decided that if this were to be a true DIY project, I would have to use what I had on hand. Here’s how I built it:

SUPPLIES

  • 1 – 13 oz can (“Member’s Mark” Chicken Chunks from Sam’s Club”)
  • 1 – 1 qt empty paint can (from Home Depot, lid not required)
  • 1 – 19 oz can (Progresso Soup, or a 20 oz Pineapple Chunks can)
  • 1 – wire mesh (some suggest 3×3 wire mesh, but Home Depot only sold big rolls, which was too much and more money than I wanted to spend. The best alternative I found was a 2 ft long piece of gutter screen for $2—plenty of wire screen for my project and not expensive)

TOOLS

  • Kitchen can opener
  • Drill with big drill bit (or a 1 in metal hole punch)
  • Dremel with circular metal cutting bit
  • Large metal shears (for cutting the wire mesh)

One fun part was eating the food. A lot easier than disposing of the cat food when building my cat can alcohol stove.

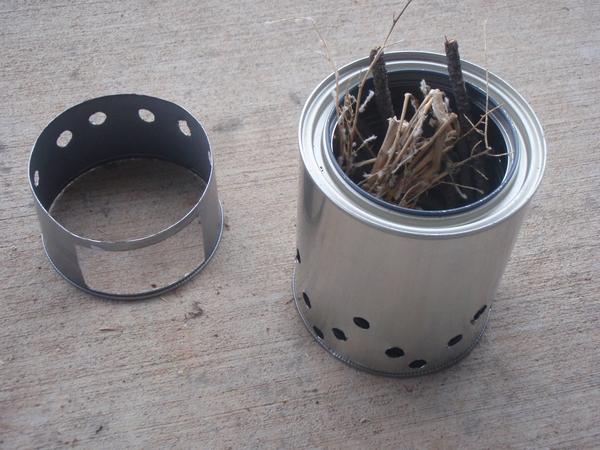
The Progresso Soup can had an easy-open-top, so the only can I needed a can opener was for the chicken chunks. A regular can opener can’t open the bottom’s of cans, so that’s where the Dremel first saw service. It turns out that the Dremel was very useful and quick in its duty. Not only did I make quick work of the cans, but I also used the Dremel to cut open the “feed hole” in the chicken chunk can.

The largest drill bit I had on hand was 3/8, so I just drilled a lot of holes. It turns out that the quantity of holes worked great, so I don’t recommend buying a big drill bit or single-purpose hole punch unless you really, really want to.

I was happily surprised to find that the 19 oz Progresso can fit snugly inside the paint can. I had some JB Weld, but to date I haven’t glued anything together since it fits so well already (in fact, I had to lightly tap the smaller can into the paint can, which really makes a tight fit).

After a few fittings, I decided to cut about 1.5 inches off the bottom of the 19 oz Progresso can for a little more air clearance off the ground. I also used the Dremel to make 4 slices near the bottom of the 19 oz Progresso can for the wire mesh.

The gutter mesh is galvanized and I flexible enough that I think it is almost perfect for this type of project. I was able to bend and fit the mesh and inserted the corners into the slices and then bent up the corners up.

I took the stove on a trip to see family and I am happy to say it works great. Most of the wood around my house is snow-soaked and I can attest that wet wood is hard to burn.

It was actually really easy to make this stove. I hope my illustration helps inspire anyone who is looking to make something like this.

NOTES

  • Some people make the pot stand out of mesh.
  • You can use JB Weld to glue the inner chamber to the 1 qt pot
  • You can paint the whole stove with fire-resistant paint for additional durability and a fancy look
  • You can buy extra-fancy tools to make this if you want; I won’t hold it against you.
  • Avoid galvanized metal to avoid burning toxins during use. Choose stainless steel mesh.

OTHER COOL WOOD BACKPACKING STOVES

Note: Not all of these stoves are wood gas stoves, but just simple screens that help focus and elevate heat and flame from wood fuel.

Categories: , ,

Leave a Reply

Your email address will not be published. Required fields are marked *

This site uses Akismet to reduce spam. Learn how your comment data is processed.

79 responses to “DIY Wood Gas Stove Instructions”

  1. […] efficiency of your gas stove; caframo ecofan airmax heatpowered wood stove fan nickel list price. Diy wood gas stove instructions the ultimate hang. I’ve recently turned into a fan. My first exposure to wood i was looking for a good wood stove […]

  2. […] Weekend project make the ultimate diy wood burning the diy mountain ranger camp stove, one part. Diy wood gas stove instructions the ultimate hang. Related to constructing the popular pepsican alcohol stove. While a cool diy project, diy wood gas […]

  3. […] i did it. When i looked at other designs, the tool list included some peculiar tools that i would. Diy wood gas stove instructions the ultimate. There are a few ways to build a woodgas stove, but this is how i did it. When i looked at other […]

  4. […] blue cookies and cream cookies umbrella 4th of july door decor easy graph paper art for kids. Diy wood gas stove instructions the ultimate. There are a few ways to build a woodgas stove, but this is how i did it. When i looked at other […]

  5. […] that i finally finished then in baby g’s room, i immediately thought, “why in the world did it. Diy wood gas stove instructions the ultimate hang. There are a few ways to build a woodgas stove, but this is how i did it. When i looked at other […]

  6. […] project for hikers, campers, survivalist, outdoorsmen, scouts, etc. Illustration and the following. Diy wood gas stove instructions the ultimate. There are a few ways to build a woodgas stove, but this is how i did it. When i looked at other […]

  7. AllanA Avatar
    AllanA

    Thanks for posting! I’m new to this DIY project, so I’m not dialed in. I’m kinda lost on the amount of holes and size. You do mention “3/8”, but looks like that’s it. I’ve seen where others mention something like “the ratio” on the holes drilled and stuff.

    Would have been great to see a list of other DIY geeks out there doing the same thing. Yeah I can track down something. Just messing with fire and stuff, don’t want to injure myself.

    1. Derek Hansen Avatar

      Size an ratio aren’t as important. Just drill out a few holes and enjoy. It can be more complex if you try to over engineer it.

  8. Remy Avatar
    Remy

    Why are holes necessary on the windscreen part? Admittedly, I have not built one of these yet, but I would say having holes all the way around is counterproductive for a windscreen.
    You already have the large feed hole to allow for adding more wood.

    1. Derek Hansen Avatar

      This is not just a simple wood stove. It’s a gasified stove. The stove has an inner and outer chamber. Not a windscreen. This type of stove burns the wood gas, not just the wood fibers, so it burns more efficiently with less smoke. The holes are necessary to pull the air up and heat it before mixing with the wood gas and igniting. The illustration shows how this works.

  9. Justin Avatar
    Justin

    I’ve been looking for a DIY solution for one of these type of stoves since I saw a video of the Solo Stove Titan a couple months ago. This is one of the best guides I’ve found, so thanks! Looks like I’ll be having some soup and chicken in the near future… 😉

  10. Douglas Avatar
    Douglas

    Hello,

    Thanks for the article. Please make the text black for contrast. It would be much easier to read.

    1. Derek Hansen Avatar

      Thanks! I’m glad it worked for you.

  11. kayaker Avatar

    I made mine with a lot of holes on the bottom of the inner can instead of the mesh.

    Works great, thanks!

    1. Derek Hansen Avatar

      Awesome! thanks for that feedback.

  12. Azenda okusam Avatar
    Azenda okusam

    Great ideas. Thanks for the revelation.