DIY Wood Gas Stove Instructions

NOTE: I originally posted this on HammockForums.net in January 2011, but it is only accessible by donating members, so I thought I would repost on my blog for easier access.

I’m a latecomer when it comes to wood gas stoves, but after building my own version over the 2010 Christmas break, I’ve recently turned into a fan. My first exposure to wood-burning backpacking stoves was a Sierra stove that another adult leader brought to a Boy Scout training event. At the time, I thought they were too much hassle, a bit messy, and (in the case of the Sierra) required batteries and electronics that I worried would be difficult to repair in the field.

After so many posts on HF, I decided to look into wood stoves and with sclittlefield‘s photos and instructions, I went out to build my own (I couldn’t afford any of the commercial variants at the time).

Do-it-yourself (DIY) Wood Gas Stove Instructions

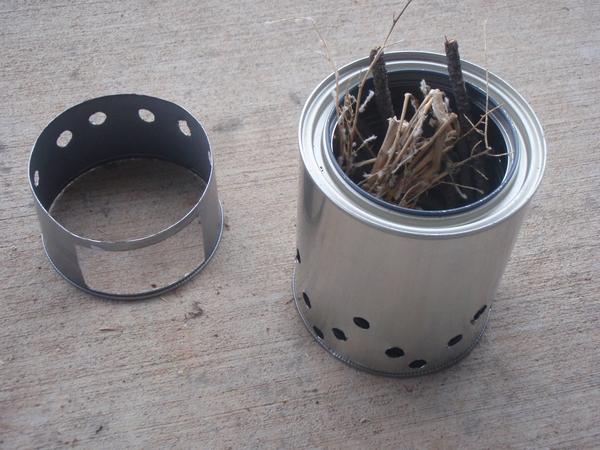
There are a few ways to build a wood-gas stove, but this is how I did it. When I looked at other designs, the tool list included some peculiar tools that I would never really use much like large hole punches and strange lid removers. I decided that if this were to be a true DIY project, I would have to use what I had on hand. Here’s how I built it:

SUPPLIES

  • 1 – 13 oz can (“Member’s Mark” Chicken Chunks from Sam’s Club”)
  • 1 – 1 qt empty paint can (from Home Depot, lid not required)
  • 1 – 19 oz can (Progresso Soup, or a 20 oz Pineapple Chunks can)
  • 1 – wire mesh (some suggest 3×3 wire mesh, but Home Depot only sold big rolls, which was too much and more money than I wanted to spend. The best alternative I found was a 2 ft long piece of gutter screen for $2—plenty of wire screen for my project and not expensive)

TOOLS

  • Kitchen can opener
  • Drill with big drill bit (or a 1 in metal hole punch)
  • Dremel with circular metal cutting bit
  • Large metal shears (for cutting the wire mesh)

One fun part was eating the food. A lot easier than disposing of the cat food when building my cat can alcohol stove.

The Progresso Soup can had an easy-open-top, so the only can I needed a can opener was for the chicken chunks. A regular can opener can’t open the bottom’s of cans, so that’s where the Dremel first saw service. It turns out that the Dremel was very useful and quick in its duty. Not only did I make quick work of the cans, but I also used the Dremel to cut open the “feed hole” in the chicken chunk can.

The largest drill bit I had on hand was 3/8, so I just drilled a lot of holes. It turns out that the quantity of holes worked great, so I don’t recommend buying a big drill bit or single-purpose hole punch unless you really, really want to.

I was happily surprised to find that the 19 oz Progresso can fit snugly inside the paint can. I had some JB Weld, but to date I haven’t glued anything together since it fits so well already (in fact, I had to lightly tap the smaller can into the paint can, which really makes a tight fit).

After a few fittings, I decided to cut about 1.5 inches off the bottom of the 19 oz Progresso can for a little more air clearance off the ground. I also used the Dremel to make 4 slices near the bottom of the 19 oz Progresso can for the wire mesh.

The gutter mesh is galvanized and I flexible enough that I think it is almost perfect for this type of project. I was able to bend and fit the mesh and inserted the corners into the slices and then bent up the corners up.

I took the stove on a trip to see family and I am happy to say it works great. Most of the wood around my house is snow-soaked and I can attest that wet wood is hard to burn.

It was actually really easy to make this stove. I hope my illustration helps inspire anyone who is looking to make something like this.

NOTES

  • Some people make the pot stand out of mesh.
  • You can use JB Weld to glue the inner chamber to the 1 qt pot
  • You can paint the whole stove with fire-resistant paint for additional durability and a fancy look
  • You can buy extra-fancy tools to make this if you want; I won’t hold it against you.
  • Avoid galvanized metal to avoid burning toxins during use. Choose stainless steel mesh.

OTHER COOL WOOD BACKPACKING STOVES

Note: Not all of these stoves are wood gas stoves, but just simple screens that help focus and elevate heat and flame from wood fuel.

Categories: , ,

Leave a Reply

Your email address will not be published. Required fields are marked *

This site uses Akismet to reduce spam. Learn how your comment data is processed.

79 responses to “DIY Wood Gas Stove Instructions”

  1. Nathan N. Avatar
    Nathan N.

    For a full load of twigs, how long of an active burn time are you seeing? I have done something like this using gallon paint can and #10 can, mesh in the bottom, and plenty of holes at base of outer paint can. Really hot burn but too rapid, maybe 10 or so mins to burn all to embers.

    I switched out #10 can with a ceramic vase with a few holes. It is going to need more holes, both for primary and secondary burn. I hope to create a lava rock insert to put above burn jar to heat smoke from burn jar. It has room for improvement at this point.

    1. Derek Avatar
      Derek

      Wood is a little more difficult to quantify in a simple reply. Different varieties produce different BTUs, depending on conditions. All wood burning stoves require constant fuel to maintain the burn. It is not like an alcohol stove or liquid fuel stove where you can more accurately measure burn time based on a measure of fuel. More factors are involved making it more complex to answer.

      The real advantage of a wood burner is that (hopefully) you have plenty of fuel available to you where you will be using the stove, thus reducing weight carried and minimizing the need to care about how much fuel you are burning–just burn as much or as little as needed to get the job done.

  2. […] Finally, there are small and light alcohol stoves, portable wood stoves, and solid fuel (e.g. Esbit / hexamine) stoves.  Long story short, alcohol and solid fuel stoves can be light (and can be homemade; Google tuna can stove for some nice homemade alcohol stove designs if you like DIY).  However, they can be a bear to get a good hot fire going with, even more so at altitude or in the wind.  Wood stoves are maybe the lightest option discussed here, because they don’t have any fuel weight!  They typically use clever gas-mixing baffles to burn twigs very efficiently, and many places that won’t let you have an open campfire will still let you collect twigs for one of these stoves.  If I did a lot of stove-only camping, I’d try a twig stove like the solo stove first; if you don;t want to pay the $60, you can make your own. […]

  3. Shanks Avatar
    Shanks

    Sorry for my naive question. Since I am from India and not familiar with types of cans in your country, I would like to know how did you make the inner can sit inside the outer can without any bottom support? If my understanding is correct, the inner can edge rim sits bang on the outer paint can cover lid carrogation. Right?

    1. Derek Avatar
      Derek

      The the paint can I used has an inner ring that is the same diameter as the inner can so they fit together nicely. Some people use JB Weld epoxy to glue the two cans together.

  4. Mike Dye Avatar

    Just out of curiosity, why would you want to remove the bottom of the outer can? It has holes for air intake right? if you leave the bottom on it can catch the ashes which you could bury or pack out. Just a thought.

    1. Derek Avatar
      Derek

      You need to remove the bottom so you can insert the inner can. Some folks use a side-mounted can opener so they can put the bottom back on.

      1. kay Cee Avatar
        kay Cee

        I just cut an “insertion” hole (with diameter slightly smaller than inner can) at the top of the bigger can, cut some flanges into the edges of the insertion hole. Then folded the flanges in/down into the bigger can. Then pushed/knocked the inner can into the hole until the Tim of the inner can meets the edge of the hole. No need to take off the bottom of the bigger can.

        However, with a bottom on the bigger can, it’s hard to remove ash from the gap between the inner can and the bigger can.

  5. […] one, but im a DIY kinda guy, so I figured I would post this: DIY Wood Gas Stove Instructions. DIY Wood Gas Stove Instructions – The Ultimate Hang I built my own for very little money, and most supplies I already had on hand. It turned out good […]

  6. optimumrv Avatar

    This is such a great RV and Camping Hack. Thanks for sharing.

  7. Richard Donaldson Avatar
    Richard Donaldson

    I have a few various sized tins in the pantry. A few of them are pineapple tins about 2 inches tall 🙂

    How big is the paint tin? I’ve only seen them about a foot tall; I might ask dulux for spares 🙂

    1. Derek Avatar
      Derek

      The paint can is a standard quart size. Check with your local hardware store and they should carry them.

  8. jen Avatar
    jen

    large coffee
    can and biscuit tin

  9. Dan Avatar
    Dan

    Derek and anyone else who has made one of these stoves, what kind of skillet or pot do you use? Do you think the stove can handle a cast iron skillet? I’m looking for a good quality, long lasting cook set that is light weight and will work with your stove.

    1. Derek Avatar
      Derek

      Cast iron might be too heavy. I use lighter weight backpacking pots and aluminum fry pans. Have you seen the NOLS fry bake? It’s a great all purpose fry pan.

  10. S Bradley Avatar
    S Bradley

    I have combined several designs together to create a stove that is easier to build for my grand son and his troop. It works so well that the burn at the secondary jets or holes is a blue flame. I am currently working to create a simple air control to manage the flame/temperature. a ring around the out side that will change the size of the air in take holes, right now it is plumbers tape with larger holes that simply slides around the outer can changing the air intake.

    suggested changes to the design:
    Leave the bottom in the inner can in tact, drill 4 small holes in the bottom of the can 4 mm ea. near the center. helps with the final stages of burning.

    second in stead of the wire mesh, drill holes in the side of the inner can as close to the bottom sides of the can as possible 3 mm 32 evenly spaced.

    third drill 16 4 mm evenly spaced approximately 1.5 centimeters from the top of the inner can.

    outer paint can cut a hole in the bottom to about about 4 centimeters in diameter a little larger than a toilet paper roll.

    use a stainless washer and a stainless screw to connect the inner can to the paint can lid. just an easier method of attaching the two together.
    the method you suggested works but has two problems one leaves the bottom open, second the inner can some times falls off.

    just suggestions

    1. Dan Avatar
      Dan

      So, the outer paint canis upside down with the inner can connected to the paint can lid and adjusted so the inner can lip is at the bottom of the inverted paint can. The 4mm hole at,the now, top is the cooking area.
      Am I understanding that right ?

  11. […] DIY Wood Gas Stove Instructions […]

  12. edr2015 Avatar

    Awesome DIY. I have one question though, how many uses do you think you can get out of this stove?

    1. Derek Avatar
      Derek

      Good question. I’m sure you could use it for years with occasional use. The fires don’t get hot enough long enough to really break the metal down so you should be okay for a long time. The good news is that if you ever do wear it out, it’s a cheap and easy DIY project.

      1. edr2015 Avatar

        Yes. That is the cool thing about it. A new stove will coat you $3 at the grocery store. Thanks!

  13. […] DIY Wood Gas Stove Instructions […]

  14. […] Build a doityourself tiny woodstove. Wood stoves are ideal for tiny and small homes because they. Diy wood gas stove instructions the ultimate. There are a few ways to build a woodgas stove, but this is how i did it. When i looked at other […]

  15. […] Diy wood gas stove instructions the ultimate hang. Other cool wood backpacking stoves. I was looking for a good wood stove that was diy and still light enough to replace my alky that i diy wood gas stove. Diy wood gasifier backpacking version. Diy wood gasifier backpacking version. By paul (la paz, bolivia and bc, canada) i just wanted to post a link to another diy for a wood gasifier stove. It is a. The #1 wood burning backpacking stove by solo stove. Experience the ultimate backpacking stove explore our full range of portable woodburning stoves below. Solo stove lite; if your solo stove product was. Diy wood gasifier backpacking version. Diy wood gasifier backpacking version. By paul (la paz, bolivia and bc, canada) i just wanted to post. The gasifier camp stove world news. Make sure to visit soundingtheloudcry to find out more about the 7 trumpets of revelation, the. […]