NOTE: I’ve updated this article from the original that I published on HammockForums.net in 2010.
Along with “Hike Your Own Hike,” it’s equally important to “Pick Your Own Pitch” and “Choose Your Own Tarp.” Just as there are as many hammock options to choose from, there are equally as many tarp configurations and rigging options to match. This is good news, really, because it means you can customize your shelter system to match conditions. I have several tarps to pick from depending on my trip type: lightweight, winter camping, super coverage, etc.
HAMMOCK CAMPING TARPS
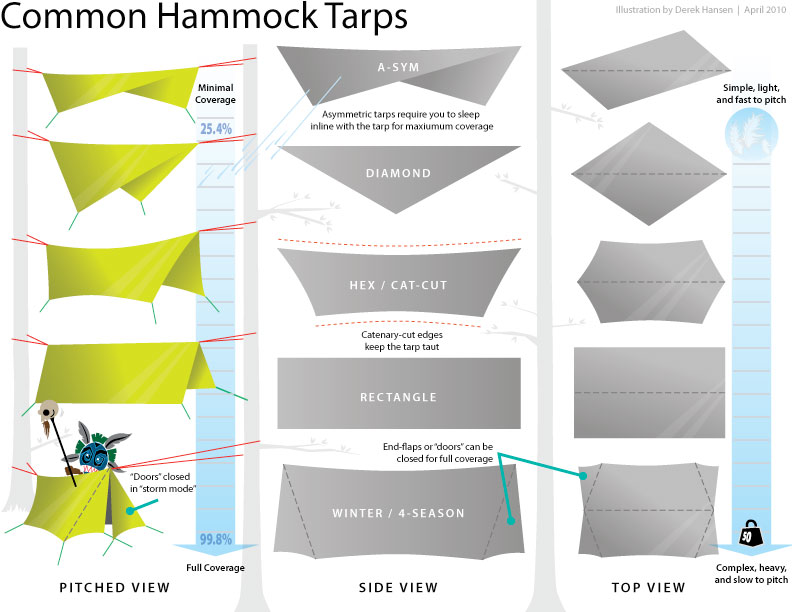
When it comes to tarps, some prefer full coverage while others get skimpy. There’s no right or wrong answer here, and your choice depends on many factors: weight, coverage, versatility, durability, etc. And while there are tarps designed specifically for hammocks, nearly any tarp will work so long as it provides the coverage you are looking for.
It is generally agreed that full-coverage tarps, or “winter” tarps are best for four-season camping when you need maximum protection from the elements. Winter tarps usually add extra flaps or “doors” to the ends of the tarp that can be folded inward to enclose all four sides. Some manufacturers sell “doors” as an optional add-on to common hex or cat-cut tarps (a common add-on door is called the Grizz Beak).
Large tarps also provide good privacy for modesty when changing clothes, etc. There are some trade-offs with large tarps. Big tarps with extra tie-outs provide a lot of versatility and pitching options. And while you get extra coverage and protection from the elements, it can take some practice to master the pitching teqniques to get the most out of these shelters. Large tarps typically weigh more and can require extra hardware (e.g., stakes, guylines).
In moderate conditions, almost any tarp can be modified for good coverage, ventilation, and privacy. Some users have successfully used ponchos as dual-purpose a-sym tarps. Diamond tarps offer more coverage than a-sym design and are equally simple to pitch. Keep in mind, however, that smaller tarps require greater skill to keep dry in adverse conditions. It is often necessary to sleep in a specific direction under an a-sym tarp to maximize coverage.
Square or rectangular tarps with multiple tie-outs can allow for greater pitching options than other tarps. (Check out my Hammock Manufacturers page for a list of hammock-compatible tarps on the market.)
What Size? Regardless of what style tarp you choose, you want to ensure the tarp extends between 6 to 12 in. (15 to 30 cm) over each end of your hammock. An 8×10 ft (2.4×3 m) tarp turned ~39° to be an asym tarp provides a ridge line of nearly 13 ft (4 m). This would provide ample coverage for nearly any hammock. Remember that a hammock sags when properly hung so a 10 ft (3 m) long hammock will have a peak-to-peak length of just over 8 ft (2.4 m).
RIDGE LINES
One great advantage of hammock camping with tarps is that in adverse conditions—rain, snow, wind—you can set up the tarp first and then keep your gear dry as you set up the hammock and sleep system.
Rigging A Tarp—Without Hardware
Most ridge lines fall under one of two categories: end-only or full-length. End-only lines essentially eliminate the rope between the tarp tie-outs, which can reduce some weight. Full-length ridgelines run the entire length of the tarp and can be used under the tarp or over the tarp.
With a full-length ridgeline, you can set the line first and then adjust the tarp along the line to center it. It is often easier to center a tarp between the supports with a full-length ridgeline than with end-only lines.
Hanging the tarp over a full-length ridgeline provides additional structure and can be preferred during extreme conditions when the ridgeline can help support extra weight, such as during a snow storm. With the ridgeline running under the tarp, it also provides handy points for clipping gear to air dry, or to attach a bug net.
Whether you use a full or end-only ridge lines, one method for attaching the line to the support is to create a “V” around the post (see illustration). Essentially, you begin to loop the line around the support starting at the end point of the tarp. You then take the line around the support and then attach the line back at the beak of tarp. This creates a space so the hammock suspension can swing with less collisions against the tarp suspension line.
GUY LINES
Once the ridge of the tarp is set, you can set the guy lines. Diamond or asymmetric tarps have as little as two guy points, so set-up can be quicker. Guy lines of approximately 6 ft (1.8 m) allow enough length so you can guy the tarp around other nearby supports or to a stake in the ground.
Pitch the tarp low during adverse conditions. Pull the tarp out and open, even using trekking poles or sticks to open the tarp for more ventilation or views. You can also guy down one side of a tarp to protect from wind and rain and open the other side in “porch mode,” depending on conditions.
Many tarps (e.g., those made with nylon) stretch during the night, so even the tightest pitch before going to bed may slacken by morning. You can retrofit guylines with elastic shock cord or purchase them ready-made from several manufacturers. With shock cord on the guy line, the tarp will remain taut as the tarp stretches.


Leave a Reply