Skip to content

Handy Hammock Stand Review

OUTLINE


Initial Summary

Handy Hammock has done an amazing job of simplifying “space-age” technology for the masses. Overall, I like this stand, but it has its limitations. It is similar in design to the 3-person hammock tensegrity stand I illustrated in my book, borrowed from Camp Elsewhere’s Burning Man design. It’s simple, sleek, and well-designed. For me, the best feature of the Handy Hammock is that it’s really lightweight, strong, and packable. This stand is useful in places where trees or anchors are not available like parks, beaches, and backyards, but also along trails where tree selection is limited or non-existant (e.g., thru-hikes along the PCT, CDT, or AZT). The major drawback? It’s not free-standing and requires some space to stake down the supporting struts.

PROS:

  • Lightweight, packable stand
  • Fairly simple set-up
  • The stand can be easily modified and used with other hammocks
  • Comfortable hammock

CONS:

  • Large footprint—The stand requires a minimum space to set up, just over 15 ft/4.6 m (64 × 182 in | 163 × 462 cm)
  • Not free-standing—Requires ground anchors, which could be problematic in some areas
  • Trip wires—The bright, neon yellow guy lines are still a trip hazard.
  • Difficult field repairs—The guy lines are easily repairable or replaceable, but if one of the tension lines on the struts gets cut, or frayed, I can’t think of how you could fix this in the field.

Product Information

handyhammock logo

Manufacturer: Hammock Limited, UK
Year of Manufacture: 2012, made in the UK
Manufacture Website: http://www.handyhammock.co.uk
MSRP: £99

Hammock

Fabric: Parachute polyester
Fabric Dimensions: 56 × 95 in (124.25 × 241.25 cm) (56 × 117 in/124.25 × 297.2 cm total)—the rope nettles adds 22 in (56 cm) (11 in/28 cm on each side) for a total length of 117 in (297 cm)
Measured Weight: 10.5 oz (298 g), which includes rope nettles and steel rings
Listed Capacity: 275 lbs (125 kg)

Stand

  • 6 ground plates with measured line @ 1.4 oz (40 g) ea.; (0.3 in/8 mm thick, 2.7 in/69 mm diam)
  • 2 guy lines (1.25 oz/35 g for both)
  • 12 stakes @ 1.1 oz (31 g) ea.; 13.25 in (34 cm) long x 0.25 in (6.5 mm) diameter
  • 2 struts; 54.5 in (138.4 cm) tall; 10.05 oz (285 g) ea.

Measured Weight: 38.75 oz (1 kg) (stand: suspension/struts, guy line, stakes)

Listed Weight: (1.53 kg)
TOTAL WEIGHT: 49.25 oz (1.4 kg) (stand + hammock)

Listed Features:

  • Supports up to 275 lbs (125 kg/20 stones)!
  • Struts and anchor pegs made from aircraft-grade, 7075-T6 Aluminium/Zinc alloy
  • Unique featherweight folding-struts braced with super-strong Kevlar® cord
  • High impact, durable nylon mouldings (reinforced with glass-fibre)
  • UK designed and UK manufactured – precision engineered
  • Quick to erect and dismantle
  • Supplied with weatherproof bag
  • Guy-lines made from Dyneema® (595 lbs/270 kg breaking strain)
  • Unique “tri-pin” ground anchor system gives secure ground anchorage

Product Description

The Handy Hammock is currently sold as a combination hammock and lightweight, portable hammock stand. The hammock itself is a simple, gathered-end hammock made from parachute polyester with a weight capacity of 275 lbs (125 kg). The hammock is made from one piece of fabric, hemmed on the edges, with 1 in (2.5 cm) channels on each end. On the end channels, small holes have been melted into the fabric. Threaded through these holes are the nettles, or suspension ropes, that completes the the hammock and gathers each end. The nettles terminate onto a small 1 in (2.5 cm) steel ring—inner diameter measures 3/4 in (2 cm).

Also fastened onto each steel ring is one set of Dyneema guy line. The guy line is a bright, florescent yellow and on each end is a small plastic ball toggle. The guy line and hammock are connected together and are used together to keep the stand upright.

The stand is very minimal. The two, two-piece aluminum “struts” are held together with some shock cord but also with an ingenious tensioners. The tensioners slide and then “pop” into place making the struts very rigid. These two struts are held in place with the guy lines that are staked to the ground.

The 12 stakes are stored on the struts, which helps make the stand a very compact and portable package.

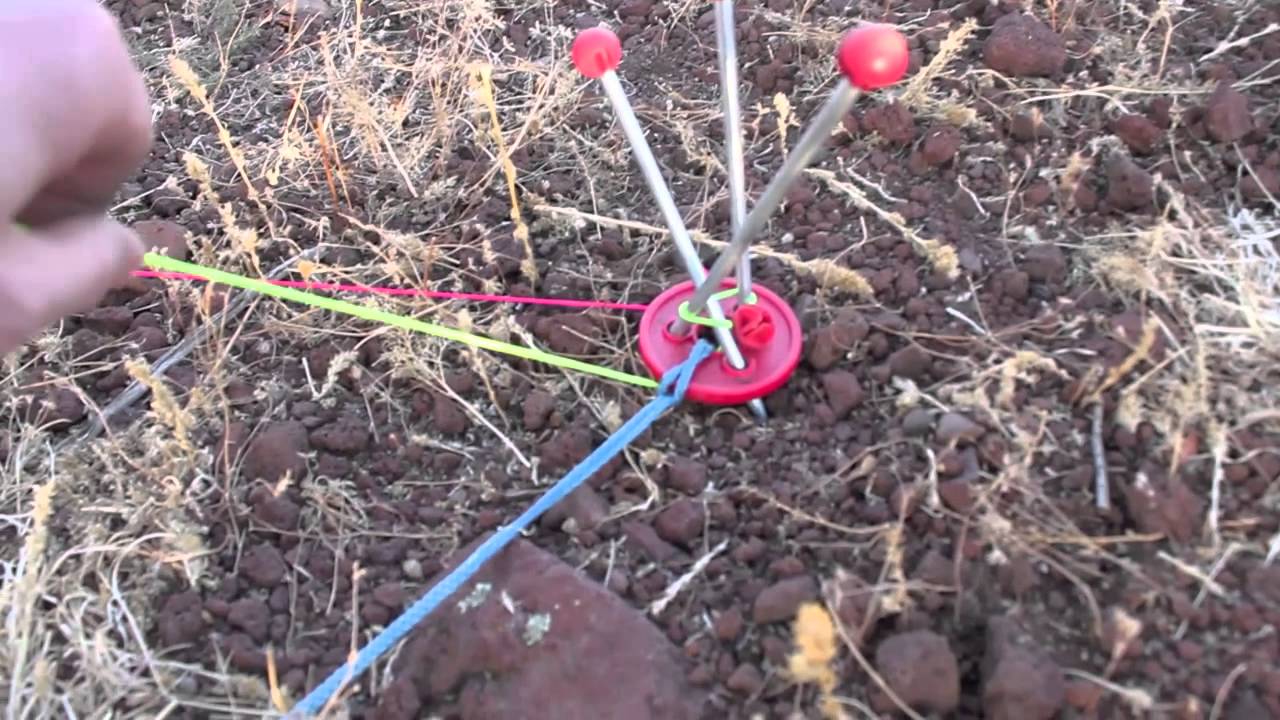
To make set-up easier, there are six (6) base plates, separated into three sets of two plates. The pair of base plates are connected with a length of string. Each base plate has three small holes where the stakes are fitted, and a large central hole where the ball toggle can be threaded for the guy line.

The hammock prevents the struts from falling backward and the guy lines help direct the weight in the hammock into compressive forces down the struts and into the ground, using the principle of tensegrity.


Initial Impressions

When I first saw the Handy Hammock I was simply struck with awe. The stand looked impossible: lightweight aluminum struts and thin line holding up hundreds of pounds off the ground? The manufacturer makes the whole system look like child’s play, yet the forces at work are hinging on rocket science. I was elated when Handy Hammock offered to send me a review sample.

The whole kit, hammock and stand, comes in a carrying bag with an adjustable shoulder sling. The first thing that worried me was that the hammock was wrapped around the struts and line. Perhaps a pet-peeve of mine, but I prefer to keep my hammocks packed separate from gear that has potential for getting dirty, as the stand will be. The other thing I noticed was that the hammock and the guy lines were connected. This means that in order to set up the stand, the hammock must be laid on the ground, another pet-peeve of mine. One of my first resolutions was to find out if I could pitch the stand while keeping the hammock separate.

The hammock is very basic but perfectly viable. It reminds me of the Grand Trunk Goods Ultralight hammock. They share similar fabric but the Handy Hammock dimensions are a little bigger.

One thing I noticed about the stand is its high-level engineering. Each component was well-thought out and designed using simple, interchangeable parts. For example, almost each component uses similar “ball toggles.” These red, plastic knobs are rounded on one side and have indentations on the opposite side. Each stake uses a ball on the head. The guy lines each have two balls that are used as toggles. Each hinge on the strut uses multiple balls as joints, etc.

One advantage of this stand is that everything is pre-set and pre-measured. This means, like a tent, you can consistently set it up without worrying too much about varying trunk diameters, distances between trees, and suspension angles.

Why This Stand? Where To Use It?

Handy Hammock is marketing this stand to the layman with little or no hammock experience, which is one reason they have focused so much attention on trying to simplify the set-up process. I think the manufacturer envisions this hammock being used in residential backyards, beaches, parks, and open fields.

However, when I saw this stand I immediately thought of its application with outdoor activities such as backpacking and camping. Not only are there some places (e.g., various campgrounds) where attaching anything to a tree is prohibited, some hiking trails have sections where trees are sparse or nonexistent. For thru-hikers along the PCT, JMT, CDT, or AZT, this stand could be taken on sections where trees are not present and sleeping on the ground is not desirable.


Setting Up The Stand

The hammock kit comes with a set of instructions that clearly identify the steps for erecting the stand. I also watched a few set-up videos from other users. Before going out for my first attempt, I felt I had a pretty good grasp of how to set it up. However, my first attempt was a bit of a failure (watch my video to see some clips). Part of the reason is my own fault: I disassembled the guy lines from the hammock in an attempt to keep the hammock from touching the ground. In the end, the hammock fell on the ground anyway, so I had to re-think my process.

In very basic terms, these are the steps to erect the stand:

  1. Stake down the ground plates, using the guy line and ground plate line to determine the correct distances.
  2. Assemble the struts and connect the middle pair of ground plates.
  3. Use the hammock to connect the two struts and keep them from falling over.

Recommended Modifications


Disclaimer: The author (Derek Hansen) was provided with a free sample of the Handy Hammock from the manufacturer upon request for testing and evaluation purposes.

67 thoughts on “Handy Hammock Stand Review”

    1. I will check and see. I’m also going to test a longer 11 ft (3.3 m) hammock as well. The issue with a Hennessy will be the attached suspension rope on either end. You could either remove the stock rope and replace it with a loop, or use a hardware go-between. I’ll append this post with my findings; thanks for asking!

        1. I’ve never tried the Madera stand, but it looks interesting. It looks like it is only one support. I’m not sure how it would work with two stands. The Hennessy Hammock could work, but you may have to modify the stock suspension.

      1. Yes! The Hennessy worked out great with the mod I put on (carabiner and amsteel loop). Just widen the distance between the struts. Here’s the measurements I used (as seen in the images with the Hennessy):

        Distance between struts:
        TOP: 136 in (345 cm)
        BOTTOM: 92 in (234 cm)

  1. I have one of these and its used all the time. Assembly is quick and easy and durable. Comes in as the name states handy almost anywhere we needed to stop and pitch. Great product.

    1. I found the stand to work with hammocks up to 11 ft (3.3 m) long (NOTE: that is the measured, flat length; a hammock is “shorter” when hung with a proper sag). The Clark hammock should fit fine between the struts, the question is about the suspension. If you look at the modifications I did to the stand, I rigged a short loop of 7/64″ am steel and then connected a small climbing-rated carabiner. This gave me an attachment point that would work with all my hammocks one way or another. The carabiner is not needed with some styles of hardware (e.g., Whoopie Hook from DutchWare). The trick is that the attachment point is near the end of the hammock. With my Hennessy with the stock rope, I was able to tie off as close as I needed. I’m sure the Clark will fit, it’s just a matter of adjusting the suspension system.

  2. Not really understanding all the details and stressors – would it be feasible to replace the two longest support (struts?) with sturdy – probably fixed length – trekking poles, to save weight?

    1. The way the stand is constructed, it is not possible to remove the struts and replace them with trekking poles, but it’s a great idea. I think it would be difficult, however, to make a stand that would work with trekking poles. The grips would be a major problem to overcome. The strands of cord apply compressive forces from the tips of the metal struts and the four poles in the center keep the strut from bending. It’s a very interesting design that puts tensegrity to good use.

      1. I’ve been playing with the trekking pole idea as well, but the extreme forces counteracting each other wo make this work make it very hard to calculate – and almost impossible (at least for a layman such as me) to reproduce with adjustable poles

  3. Hi Derek

    I just played with my handyhammock stand. Thanks for the modifications tips.

    One thing I did was instead of connecting the two strut with a shock-cord, I added a small shock-cord to one of the small arm in the middle of the strut. Now I am able to set up each strut free-standing.

  4. I will post it on hammockforum. It is easier. My put up
    time is Less than 3 minutes each strut. Take down time is less than
    two minutes each side. I did add 4 whoopies on each side to make
    the tetrahedral bigger to handle more upright position of the
    struts. Then two short whoopies with Dutch hooks to connect to any
    hammocks. So total of six whoopies added to each side.

    1. Hi there!

      Just wondering, where might I find your mod to make the HH free-standing? I combed through HF but couldn’t seem to find it. Have you found your mod to be a viable alternative/mod in the long(er) run? I.e., has it held up over the past ~8 months?

      Thanks!

      1. Hey Brittany. There is no mod specific to the Hennessy per se. The mod instructions here work for the Hennessy and any other hammock. The only trick is to separate the struts so you can lengthen the distance between them. The shock cord keeps the stand from falling while you set up the hammock. The stand and the mods have held up great and I continue to use it.

    2. Georgemaung,
      I have gone to Hammockforum and looked through your posts hoping to see pictures of your modifications. I haven’t been able to find them. I am very interested in seeing what you have done. Could you post pictures here or tell me where to find them on Hammockforum. Thanks.

      1. The main modifications I’ve illustrated in the post. Some of these mods have been incorporated into the retail version. For example, I added the shock cord between the struts, the Amsteel loops and Dutch Whoopie Hooks or Biners to allow me to attach the hammock after the stand is up.

        Recently, to try and save more weight, I eliminated all but two (2) of the plastic ground discs and measuring lines. Since the triangles are basically equal distances, I use the “tendon” lines to measure everything out. I stake the pegs in at angles and then wrap the tendon lines in a figure-8 pattern before locking it down. The two ground discs are used to keep the struts from digging deep into the ground. This isn’t really a “mod” per se, but it has saved a lot of weight overall. I now prefer not having so many lines to get tangled up. It’s more convenient, and probably stronger, to use the discs with the ground pegs, but it has been working for me so far.

  5. This was a GREAT review, Derek! Very informative and sheds whole new light on me picking up the stand for beach/camping trips. Any idea if the stand would work on an ENO Double Hammock?

      1. How about a WBBB XLC with a big guy in it (230lb)? Any guess what clearance might be like, and if it could still accommodate an UQ beneath it in those circumstances?

        A single Handy Hammock strut per hammock might be a great solution for camping or backpacking when trees are somewhat scarce and especially when you want to hang two hammocks beside each other (e.g. spokes off a hub). Four out of five dentists agree it is clinically proven to be 100x easier to find one tree in a good place rather than 3-4 trees just the right distance apart. Also you should floss…

        1. I haven’t personally tested the XLC on the stand but based on my experience I think it would be fine. It might be a little lower than chair height.

  6. What is the easiest way to figure out the required distance between the struts for different hammocks? Thanks for the great review, and your continued responses to everyone

  7. Pingback: Trip Report - Texas Group Hang 2014 | The Ultimate Hang

  8. I bought the modified Handy Hammock pack that comes with extra hardware based on your review. On my first test I’ve found that the bug net I picked up (eno guardian) sags a lot, to the point that the netting is touching my skin. Any suggestions? I’m using the hammock that comes standard with the HH.

    1. Any bug net like the ENO Guardian requires some “lift” to keep it off your face. Some hammocks come with internal ridge lines that function to keep the bug net away. In your case, you will need to device some sort of line that will pull the bug net away from your face.

      The Handy Hammock stand doesn’t provide much height, so you’ll likely need to use separate poles, like trekking poles or sticks, to pitch a tarp or hang a line to hold the bug net up. Another way would be to tie a line that pulls the bug net from your head to your feet. It might sag a little over your legs, but still away from your body and head.

      1. Thanks. Do you have any recommendations for hard, impacted soil? Apparently we have a lot of that around here… I was able to pour water on the soil and let it sit for a bit, but even then, the HH stakes don’t seem to be made for bad soil. I’m currently thinking of replacing the ground anchor system entirely.

        1. The choices are difficult if you are backpacking. So much depends on where you will be and what you’re willing to carry. If you are Just using the stand for local trips, you might get some 3 foot rebar and use a mallet.

  9. Hi, Derek,

    Based on your review, I’m quite interested in getting a HH double strut kit, but I have some questions that I was hoping to ask Jason. I haven’t been able to reach him by email or telephone and it’s been quite a while since they’ve updated their website. Do you know whether they’re still operating? I’m leery of ordering online when there doesn’t seem to be any way to reach them other than to process a payment.

  10. Hi Derek, thanks for the review! My brother and I are wondering if we could use 3 of these to hang 2 hammocks from in a straight line or in an “L” formation.

    We’re also wondering if these works work in the grand canyon?

    1. I’ll answer this while we’re waiting for Derek to chime in.

      My 2 cents: You probably can’t use three Handy Hammock struts to safely hang two hammocks. The angles of the struts relative to the ground and relative to the shear force generated by the loaded hammock are essential for proper operation. The only way it might work is if you made a really narrow V shape with your feet at the bottom of the V. Even then I doubt you could make it work unless both of you were light, weighed nearly the same, and got in/out of your hammocks simultaneously. Too risky and finicky to try IMO.

      I also don’t think they would be a great fit in the Grand Canyon due to the soil conditions and lack of trees there. If you could find just one tree to use as a hub using the struts to be your second and third tree would be more viable.

      If you try to use the struts for anything I can’t stress enough how important it is to test them at/near home first. There is a huge learning curve involved in getting them set up properly even when following the instructions. Modifications to their intended use only make it that much harder to dial in.

    2. I don’t think it will work as an L shape unless you equalize all three like my 3-person hammock stand. I’d just use two separate stands. They aren’t designed to be used together. .

            1. What do you think of this new stand? It just ended the kickstarter and will begin shipping to the public in a few weeks.

              Artie

              1. I know the situation about HandyHammock stand is out of stocks and there may be some other company that starts producing and selling it again. i pray for it to happen.

            2. NoGround poles ARE available. Each is handmade and done to order. They are different from the HandyHammock in that they also function as trekking poles. They are a bit complicated at first, but are lightweight enough for backpacking and do keep you off the ground in the absence of trees.

              I am also considering making a 3-part heavier and un-trussed version for car camping. These will cost less and be much simpler to set up, but will not be suitable for backpacking. While they are only single function (like the HandyHammock) they are not trussed, so shouldn’t impinge on the HandyHammock patent.

              Contact me at TiggzCraftworkz@yahoo.com if you are interested in either item.

            1. I recently purchased the ‘Ultralight Hammock Stand’ from DD Hammocks. It is almost identical to the Handy Hammock reviewed here, with one of the recommended modifications. DD Hammocks does not include a hammock with the stand, but they do include a short continuous loop attached to the steel o-ring to attach your suspension to. DD Hammocks shipped exceptionally fast getting my package from the U.K. to Kansas in 2 days.

      1. If you mean the stand from Cheryl, I found that I really do not like it. I love the HandyHammocks stand but the one from Cheryl is something different from my point of view. But you may be talking of some other model because I did not found this hammock stand on kickstarter. Can you post a link here, please? Thanks.

      2. Pingback: Keep Calm and Use a Hammock - We Are From Latvia

            1. You don’t have to modify anything but I’d recommend to shorten the distance between the tip of the hammock stand and the end of the hammock. This way the whole hammock will hang a little higher.
              I’ve spliced a short dog bone to substitute the original continous loop with triangles.

      Leave a Reply to Trip Report - Texas Group Hang 2014 | The Ultimate Hang Cancel reply

      Your email address will not be published. Required fields are marked *

      This site uses Akismet to reduce spam. Learn how your comment data is processed.