Skip to content

DIY Wood Gas Stove Instructions

NOTE: I originally posted this on HammockForums.net in January 2011, but it is only accessible by donating members, so I thought I would repost on my blog for easier access.

I’m a latecomer when it comes to wood gas stoves, but after building my own version over the 2010 Christmas break, I’ve recently turned into a fan. My first exposure to wood-burning backpacking stoves was a Sierra stove that another adult leader brought to a Boy Scout training event. At the time, I thought they were too much hassle, a bit messy, and (in the case of the Sierra) required batteries and electronics that I worried would be difficult to repair in the field.

After so many posts on HF, I decided to look into wood stoves and with sclittlefield‘s photos and instructions, I went out to build my own (I couldn’t afford any of the commercial variants at the time).

Do-it-yourself (DIY) Wood Gas Stove Instructions

There are a few ways to build a wood-gas stove, but this is how I did it. When I looked at other designs, the tool list included some peculiar tools that I would never really use much like large hole punches and strange lid removers. I decided that if this were to be a true DIY project, I would have to use what I had on hand. Here’s how I built it:

SUPPLIES

  • 1 – 13 oz can (“Member’s Mark” Chicken Chunks from Sam’s Club”)
  • 1 – 1 qt empty paint can (from Home Depot, lid not required)
  • 1 – 19 oz can (Progresso Soup, or a 20 oz Pineapple Chunks can)
  • 1 – wire mesh (some suggest 3×3 wire mesh, but Home Depot only sold big rolls, which was too much and more money than I wanted to spend. The best alternative I found was a 2 ft long piece of gutter screen for $2—plenty of wire screen for my project and not expensive)

TOOLS

  • Kitchen can opener
  • Drill with big drill bit (or a 1 in metal hole punch)
  • Dremel with circular metal cutting bit
  • Large metal shears (for cutting the wire mesh)

One fun part was eating the food. A lot easier than disposing of the cat food when building my cat can alcohol stove.

The Progresso Soup can had an easy-open-top, so the only can I needed a can opener was for the chicken chunks. A regular can opener can’t open the bottom’s of cans, so that’s where the Dremel first saw service. It turns out that the Dremel was very useful and quick in its duty. Not only did I make quick work of the cans, but I also used the Dremel to cut open the “feed hole” in the chicken chunk can.

The largest drill bit I had on hand was 3/8, so I just drilled a lot of holes. It turns out that the quantity of holes worked great, so I don’t recommend buying a big drill bit or single-purpose hole punch unless you really, really want to.

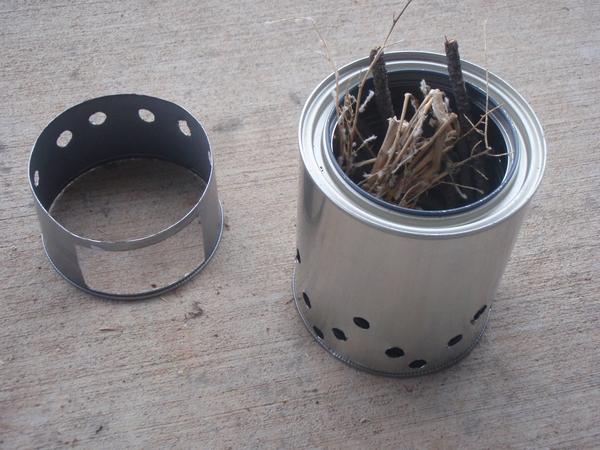
I was happily surprised to find that the 19 oz Progresso can fit snugly inside the paint can. I had some JB Weld, but to date I haven’t glued anything together since it fits so well already (in fact, I had to lightly tap the smaller can into the paint can, which really makes a tight fit).

After a few fittings, I decided to cut about 1.5 inches off the bottom of the 19 oz Progresso can for a little more air clearance off the ground. I also used the Dremel to make 4 slices near the bottom of the 19 oz Progresso can for the wire mesh.

The gutter mesh is galvanized and I flexible enough that I think it is almost perfect for this type of project. I was able to bend and fit the mesh and inserted the corners into the slices and then bent up the corners up.

I took the stove on a trip to see family and I am happy to say it works great. Most of the wood around my house is snow-soaked and I can attest that wet wood is hard to burn.

It was actually really easy to make this stove. I hope my illustration helps inspire anyone who is looking to make something like this.

NOTES

  • Some people make the pot stand out of mesh.
  • You can use JB Weld to glue the inner chamber to the 1 qt pot
  • You can paint the whole stove with fire-resistant paint for additional durability and a fancy look
  • You can buy extra-fancy tools to make this if you want; I won’t hold it against you.
  • Avoid galvanized metal to avoid burning toxins during use. Choose stainless steel mesh.

OTHER COOL WOOD BACKPACKING STOVES

Note: Not all of these stoves are wood gas stoves, but just simple screens that help focus and elevate heat and flame from wood fuel.

79 thoughts on “DIY Wood Gas Stove Instructions”

  1. Thanks for the inspiration! I made one of these today and tested it out. It works way better than I had anticipated, as most of my DIY projects end comically. I will be taking it out camping in the next week or so.

    Did you do anything to remove the inside coating on the cans? I assumed it would all burn off, but can still see lots on the inside.

    1. Fantastic! I’m glad it worked for you. I didn’t pay attention to when the lining burned out on mine, but it must eventually as there is nothing left on mine.

      1. why is everyone cutting the bottom out of the outside can? if it is going to sit on the ground no air is getting in and if you leave the bottom on no embers hit the ground.

        1. Great explanation of the principle and instruction, however I agree with the comment above.

          I keep seeing the bottom being cut off the outer can of these stoves and see no need for this, in fact heat is lost to the ground where it will be reflected back up if the metal bottom is left in place. Also, you burn the surface you place it on. If left in place scorching is minimal.

          1. To answer Patrick’s and David’s question: It is necessary to cut out the bottom of the paint can so that the Progresso soup can can be inserted into the opening from the bottom and wedged into the perfect-sized opening at the top of the paint can. The soup can will not fit down through the opening at the top of the paint can.

            It is the fortuitous, uncanny press-fit of these two cans that makes them a wonderful combination. The upper rim of a Progresso soup can fits snugly into the inner circumference of the paint can lip — it can be pounded from the bottom until it butts up tightly against the rolled edge of that inner lip. Yes, it is uncanny.

            If you cut out the bottom of the paint can with a side-cutting can-opener, you have the best of both worlds. The stove can be neatly placed back upon the can bottom to catch embers. Separating the bottom makes for easy ash removal.

            Eugene B Wary

            P.S. Thank you, Derek Hansen, for making what still seems to be the best one-page illustration of how this stove works and how to make it.

  2. It’s too bad the BSA doesn’t allow for homemade stoves for use…a troop sure could save a ton of dough, and will learn to build something like this, as it’s not your out-of-the-box kit like offered from National Supply or at school.

    1. I have never seen anything through BSA that forbids the use of homemade stoves. There is a ban on homemade alcohol stoves, but not wood burning. Where did you find this information, because I was going to make a couple of these for my sons and I…for bsa troop campouts.

  3. The best thing to look for is stainless steel hardware mesh, not galvanized mesh. I will update my post to reflect that.

    The galvanizing _can_ be removed, however. The zinc coating is what is toxic when burned and it can be burned off. If you decide to burn off the zinc, do so in a well-ventillated area, outdoors, and DO NOT breathe in any of the fumes. Granted, the coating is minimal on the mesh, but it is better to play it safe.

    Zinc can be removed by soaking the piece in a mild acid bath. Vinegar works pretty well, but the piece has to be soaked for several hours. I’ve even heard Draino works…but I’ve never tired it.

  4. To Scoutmaster Shawn, I am also a scoutmaster. I had not heard about the homemade stoves, but I did hear that BSA does not like the alcohol stoves. I would think that there is very little difference between cooking with an open fire or a wood gas stove. In all acutallity, a woodgas stove pratices LNT more that a fire. Let me know a source for the ban on the stove. I was wanting to have my troop actually build one of these for each scout and then eventually make a hammock. Then have a camping trip where they are limited to these items only to cook and sleep.

    1. Jerry, in short, there is NO ban on wood burning stoves. Making a wood burning stove might be debatable within some groups, for from my reading, it is allowed.

      The policy change came out in April, 2010 regarding the use of chemical fuels and equipment. No mention of wood stoves is mentioned in the policy.

      The policy prohibits certain chemical fuel equipment “that is handcrafted, homemade, modified, or installed beyond the manufacturer’s stated design limitations or use. Examples include alcohol-burning “can” stoves, smudge pots, improperly installed heaters, and propane burners with their regulators removed.” The policy is very specific.

      There are some scouters who feel the only “safe” solution is to use only self-igniting canister stoves, but I disagree. In my own experience, I feel that it is essential to teach safety and proper handling for all the permitted fuel types, including and especially wood burning stoves and fires. Age and experience also play a factor. Younger scouts with less experience should probably start off with canister stoves because it helps build confidence and mastery of techniques. But building and maintaining Leave No Trace campfires is a basic skill for even Tenderfoot scouts.

      It seems clear from the policy that commercially made alcohol stoves are permitted. Alcohol fuel is not banned, but it is on the “not recommended” list in the same report. These “not recommended” fuels include “unleaded gasoline; liquid alcohol fuels, including isopropyl alcohol, denatured ethyl alcohol, and ethanol.”

      From what I have read, the BSA was getting complaints and also observing a rise in injuries related to constructing the popular Pepsi-can alcohol stove. While a cool DIY project, these stoves are difficult to construct and are prone to injury, especially for the youth. My troop used to make the Pepsi-can stove, but we switched to making the cat can stove because it was easier to make (just use a single paper hole punch), was less injury prone, and the stoves performed just as well as anything else.

      Wood burning stoves are allowed, but there is some debate on whether “homemade” wood burning stoves are also prohibited based on this policy. From one perspective, you could argue that this policy is specifically addressing chemical-based stoves and fuels, not wood burning stoves. After all, an empty coffee can makes a fine wood stove and would even be recommended under Leave No Trace recommendations as you indicate. Going deeper, most scouts working on the Metalworking Merit Badge have cut, punched, and scissored metal coffee cans into all kinds of shapes. In fact, if you used the Metalworking Merit Badge as the vehicle, you could make this wood gas stove “legally” 🙂

      1. Thank you for the clarification! I asked about this on another post, and the information I have is exactly as you have described on the alcohol stoves. I’m looking forward to trying this out with the troop.

  5. Hey Derek, great post and instructions, thanks. One note on your design…shouldn’t the inner Progresso can have it’s bottom intact? That way the only air used for combustion would be the preheated air rising through the inner/outer can?

    Thanks

    1. The air flowing up through the Progresso can helps in the combustion, especially when you initially start the stove. The Progresso can is elevated so you can ignite the wood in the stove from the bottom. The mesh bottom also lets the ash filter out of the can. All of these elements are designed to make the stove more effective and efficient.

  6. Thanks Derek, I definitely trust your experience…can’t wait to make my own. Funny I used to a wood fuel guy, never to consider alcohol…now I am a alcohol guy looking into wood fuel again!

    1. You’re welcome. Take a look at other wood-gas stoves and you’ll see the same venting on the inner chamber–I can’t take credit for inventing it, just making the DIY instructions 🙂

      It’s great to have options in stoves! I started off as a canister stove guy, then fuel pump (e.g., MSR Whisperlite), then alcohol stoves. The wood stove is great, and not bad at 5 oz (142 g).

  7. More questions from me! Man for the life of me I cannot figure how you got a Progresso can into the paint can! I may try the pineapple chunks can….but all of the cans I have tried are just too big, talking like a millimeter here…You don’t have pics of the exact cans anymore do ya?

    Thanks man

    1. Josh, I’ll dig around to see if I have any photos of the cans before the build. I may have to build another one to see if the cans have changed since I first put this together.

      1. Hey Derek thanks a bunch, don’t stress too much about it, I think I figured out what the key is…Did you press the inner can into the paint can from the bottom of the paint can? I was not using this method, and only recently watched videos of guys pressing it in from the bottom. I don’t think the cans have changed, but yah that was my first thought, especialy when I saw that you had originally built this a year or more back.

        Thanks again though, I will be trying another build soon!

    1. Most people use hardware wire. I didn’t want to buy a roll so I picked up a gutter screen. It was like $2 from Home Depot. You can get the hardware wire/cloth and all other components at Home Depot for only a few dollars.

  8. I saw the note about avoiding the galvanized mesh and the associated toxins. I noticed the paint cans are coated. Any idea what the lining is/concern about that lining? TNX.

    1. Very good question. Paint cans come lined with different material. I’m not an expert, so you’ll have to check. A cursory look revealed that many cans are lined with “Gray Epoxy Phenolic,” which is toxic! Other cans are lined with tin or gold (gold-lined cans are actually safe for food, according to the FDA; not that you’d eat out of a stove…).

      What I don’t know is whether these linings can be removed to reduce their toxicity. I know some linings do burn off easily. Galvanized metal does not burn off and should be completely avoided.

      My paint can stove has burned out whatever lining it had. I also make sure it is used outdoors in a well-ventillated area.

  9. Thanks Derek … great project I just finished one with my 14 year old. I cheated and used a bit more of the hardware cloth for the pot stand instead of the chicken can …made it really easy to make the fuel port. I was looking for a good wood stove that was DIY and still light enough to replace my alky that I cannot use with the scouts. My thanks sir and about 5.3 oz finished.

  10. I just built one of these yesterday according to your plans with only one small variation: instead of cutting out the bottom of the soup can and replacing it with metal mesh, I simply drilled a bunch of holes in the bottom of the soup can. All in all I am *VERY* happy with how the stove turned out. It is easy to light, easy to keep going, and I was able to cook the soup and chicken that were in the cans in about 15 minutes with just a couple handfuls of twigs. I tried a similar design a couple weeks ago that did not work nearly as well. Thank you for the very easy and informative instructions.

  11. For a full load of twigs, how long of an active burn time are you seeing? I have done something like this using gallon paint can and #10 can, mesh in the bottom, and plenty of holes at base of outer paint can. Really hot burn but too rapid, maybe 10 or so mins to burn all to embers.

    I switched out #10 can with a ceramic vase with a few holes. It is going to need more holes, both for primary and secondary burn. I hope to create a lava rock insert to put above burn jar to heat smoke from burn jar. It has room for improvement at this point.

    1. Wood is a little more difficult to quantify in a simple reply. Different varieties produce different BTUs, depending on conditions. All wood burning stoves require constant fuel to maintain the burn. It is not like an alcohol stove or liquid fuel stove where you can more accurately measure burn time based on a measure of fuel. More factors are involved making it more complex to answer.

      The real advantage of a wood burner is that (hopefully) you have plenty of fuel available to you where you will be using the stove, thus reducing weight carried and minimizing the need to care about how much fuel you are burning–just burn as much or as little as needed to get the job done.

  12. Pingback: Stoves | Camping From Scratch

  13. Sorry for my naive question. Since I am from India and not familiar with types of cans in your country, I would like to know how did you make the inner can sit inside the outer can without any bottom support? If my understanding is correct, the inner can edge rim sits bang on the outer paint can cover lid carrogation. Right?

    1. The the paint can I used has an inner ring that is the same diameter as the inner can so they fit together nicely. Some people use JB Weld epoxy to glue the two cans together.

  14. Just out of curiosity, why would you want to remove the bottom of the outer can? It has holes for air intake right? if you leave the bottom on it can catch the ashes which you could bury or pack out. Just a thought.

    1. You need to remove the bottom so you can insert the inner can. Some folks use a side-mounted can opener so they can put the bottom back on.

      1. I just cut an “insertion” hole (with diameter slightly smaller than inner can) at the top of the bigger can, cut some flanges into the edges of the insertion hole. Then folded the flanges in/down into the bigger can. Then pushed/knocked the inner can into the hole until the Tim of the inner can meets the edge of the hole. No need to take off the bottom of the bigger can.

        However, with a bottom on the bigger can, it’s hard to remove ash from the gap between the inner can and the bigger can.

  15. Pingback: Food for BOB or INCH bags? - Page 5

  16. I have a few various sized tins in the pantry. A few of them are pineapple tins about 2 inches tall 🙂

    How big is the paint tin? I’ve only seen them about a foot tall; I might ask dulux for spares 🙂

  17. Derek and anyone else who has made one of these stoves, what kind of skillet or pot do you use? Do you think the stove can handle a cast iron skillet? I’m looking for a good quality, long lasting cook set that is light weight and will work with your stove.

    1. Cast iron might be too heavy. I use lighter weight backpacking pots and aluminum fry pans. Have you seen the NOLS fry bake? It’s a great all purpose fry pan.

  18. I have combined several designs together to create a stove that is easier to build for my grand son and his troop. It works so well that the burn at the secondary jets or holes is a blue flame. I am currently working to create a simple air control to manage the flame/temperature. a ring around the out side that will change the size of the air in take holes, right now it is plumbers tape with larger holes that simply slides around the outer can changing the air intake.

    suggested changes to the design:
    Leave the bottom in the inner can in tact, drill 4 small holes in the bottom of the can 4 mm ea. near the center. helps with the final stages of burning.

    second in stead of the wire mesh, drill holes in the side of the inner can as close to the bottom sides of the can as possible 3 mm 32 evenly spaced.

    third drill 16 4 mm evenly spaced approximately 1.5 centimeters from the top of the inner can.

    outer paint can cut a hole in the bottom to about about 4 centimeters in diameter a little larger than a toilet paper roll.

    use a stainless washer and a stainless screw to connect the inner can to the paint can lid. just an easier method of attaching the two together.
    the method you suggested works but has two problems one leaves the bottom open, second the inner can some times falls off.

    just suggestions

    1. So, the outer paint canis upside down with the inner can connected to the paint can lid and adjusted so the inner can lip is at the bottom of the inverted paint can. The 4mm hole at,the now, top is the cooking area.
      Am I understanding that right ?

  19. Pingback: Diy Wood Burning Stove - My Woodworking Guide

    1. Good question. I’m sure you could use it for years with occasional use. The fires don’t get hot enough long enough to really break the metal down so you should be okay for a long time. The good news is that if you ever do wear it out, it’s a cheap and easy DIY project.

  20. Pingback: wood stove plans diy | DIY Woodworking Projects

  21. Pingback: Youtube Diy Wood Stove – Hans F Ramsey

  22. Pingback: Diy Wood Gasification Stove Backpacking – Hans G Ramsey

  23. Pingback: Diy Wood Gas Stove With Fan – Luna S Ramsey

  24. Pingback: Diy Wood Burning Stove Project – Luna S Ramsey

  25. Pingback: Diy Wood Stove Insert – Bill S Ramsey

  26. Pingback: Diy Wood Workshop Ideas – Luna S Ramsey

  27. Pingback: Diy Solid Wood Bookshelf – Ben H Ramsey

  28. Pingback: Diy Wood Gas Stove Backpacking Plans – Ben H Ramsey

  29. Pingback: Diy Wood Burning Stove Project | Shed Plans 2016

  30. Thanks for posting! I’m new to this DIY project, so I’m not dialed in. I’m kinda lost on the amount of holes and size. You do mention “3/8”, but looks like that’s it. I’ve seen where others mention something like “the ratio” on the holes drilled and stuff.

    Would have been great to see a list of other DIY geeks out there doing the same thing. Yeah I can track down something. Just messing with fire and stuff, don’t want to injure myself.

  31. Why are holes necessary on the windscreen part? Admittedly, I have not built one of these yet, but I would say having holes all the way around is counterproductive for a windscreen.
    You already have the large feed hole to allow for adding more wood.

    1. This is not just a simple wood stove. It’s a gasified stove. The stove has an inner and outer chamber. Not a windscreen. This type of stove burns the wood gas, not just the wood fibers, so it burns more efficiently with less smoke. The holes are necessary to pull the air up and heat it before mixing with the wood gas and igniting. The illustration shows how this works.

  32. I’ve been looking for a DIY solution for one of these type of stoves since I saw a video of the Solo Stove Titan a couple months ago. This is one of the best guides I’ve found, so thanks! Looks like I’ll be having some soup and chicken in the near future… 😉

Leave a Reply

Your email address will not be published. Required fields are marked *

This site uses Akismet to reduce spam. Learn how your comment data is processed.